TODO
- [ ] Deploy laps
- [ ] policy to disable defender?
Hypervisor
Hetzner
Proxmox deployment
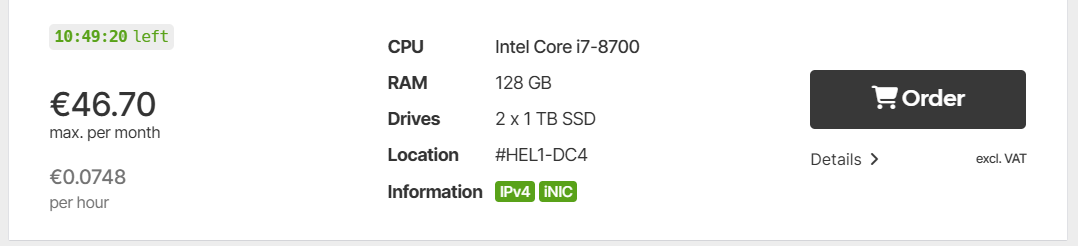
Start with a refurbished server from a Hetzner auction: Refurbished server for sale in Hetzner Server Auction
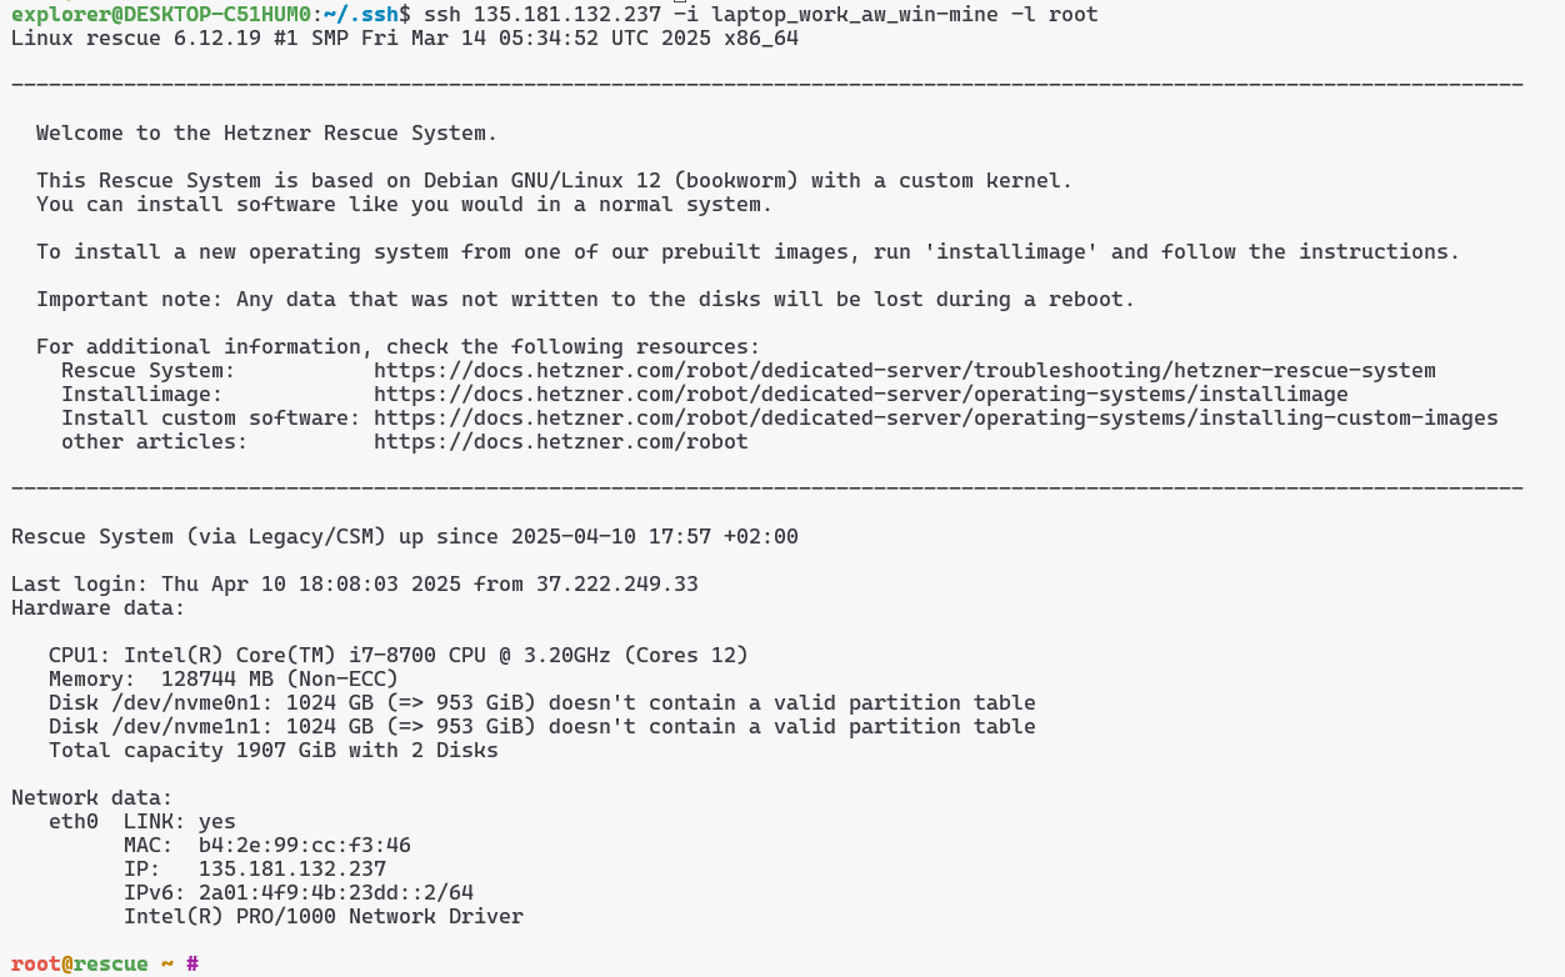
Once the server is bought and provision ssh to the rescue mode and install Proxmox using installimage:
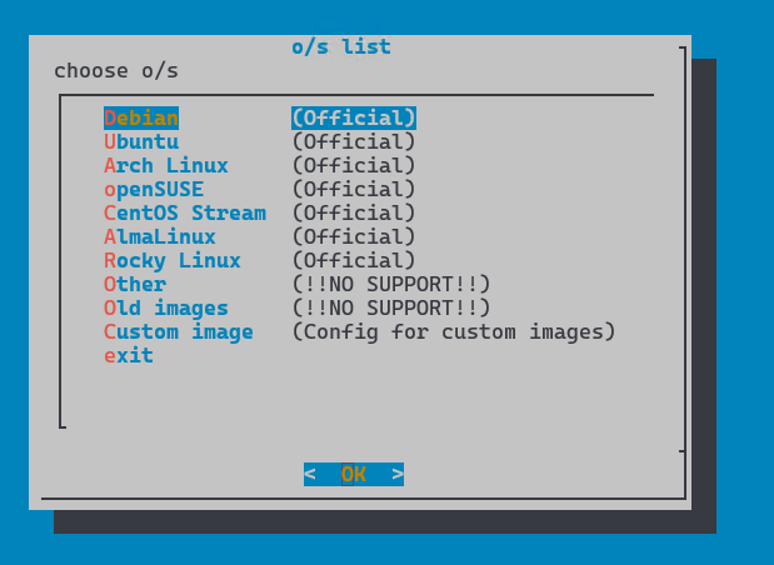
Select Other > Proxmox (Bookworm):
In the next step edit the following lines:
- Save and wait for the installer to finish.
- Connect again to Proxmox via SSH
Hetzner Firewall
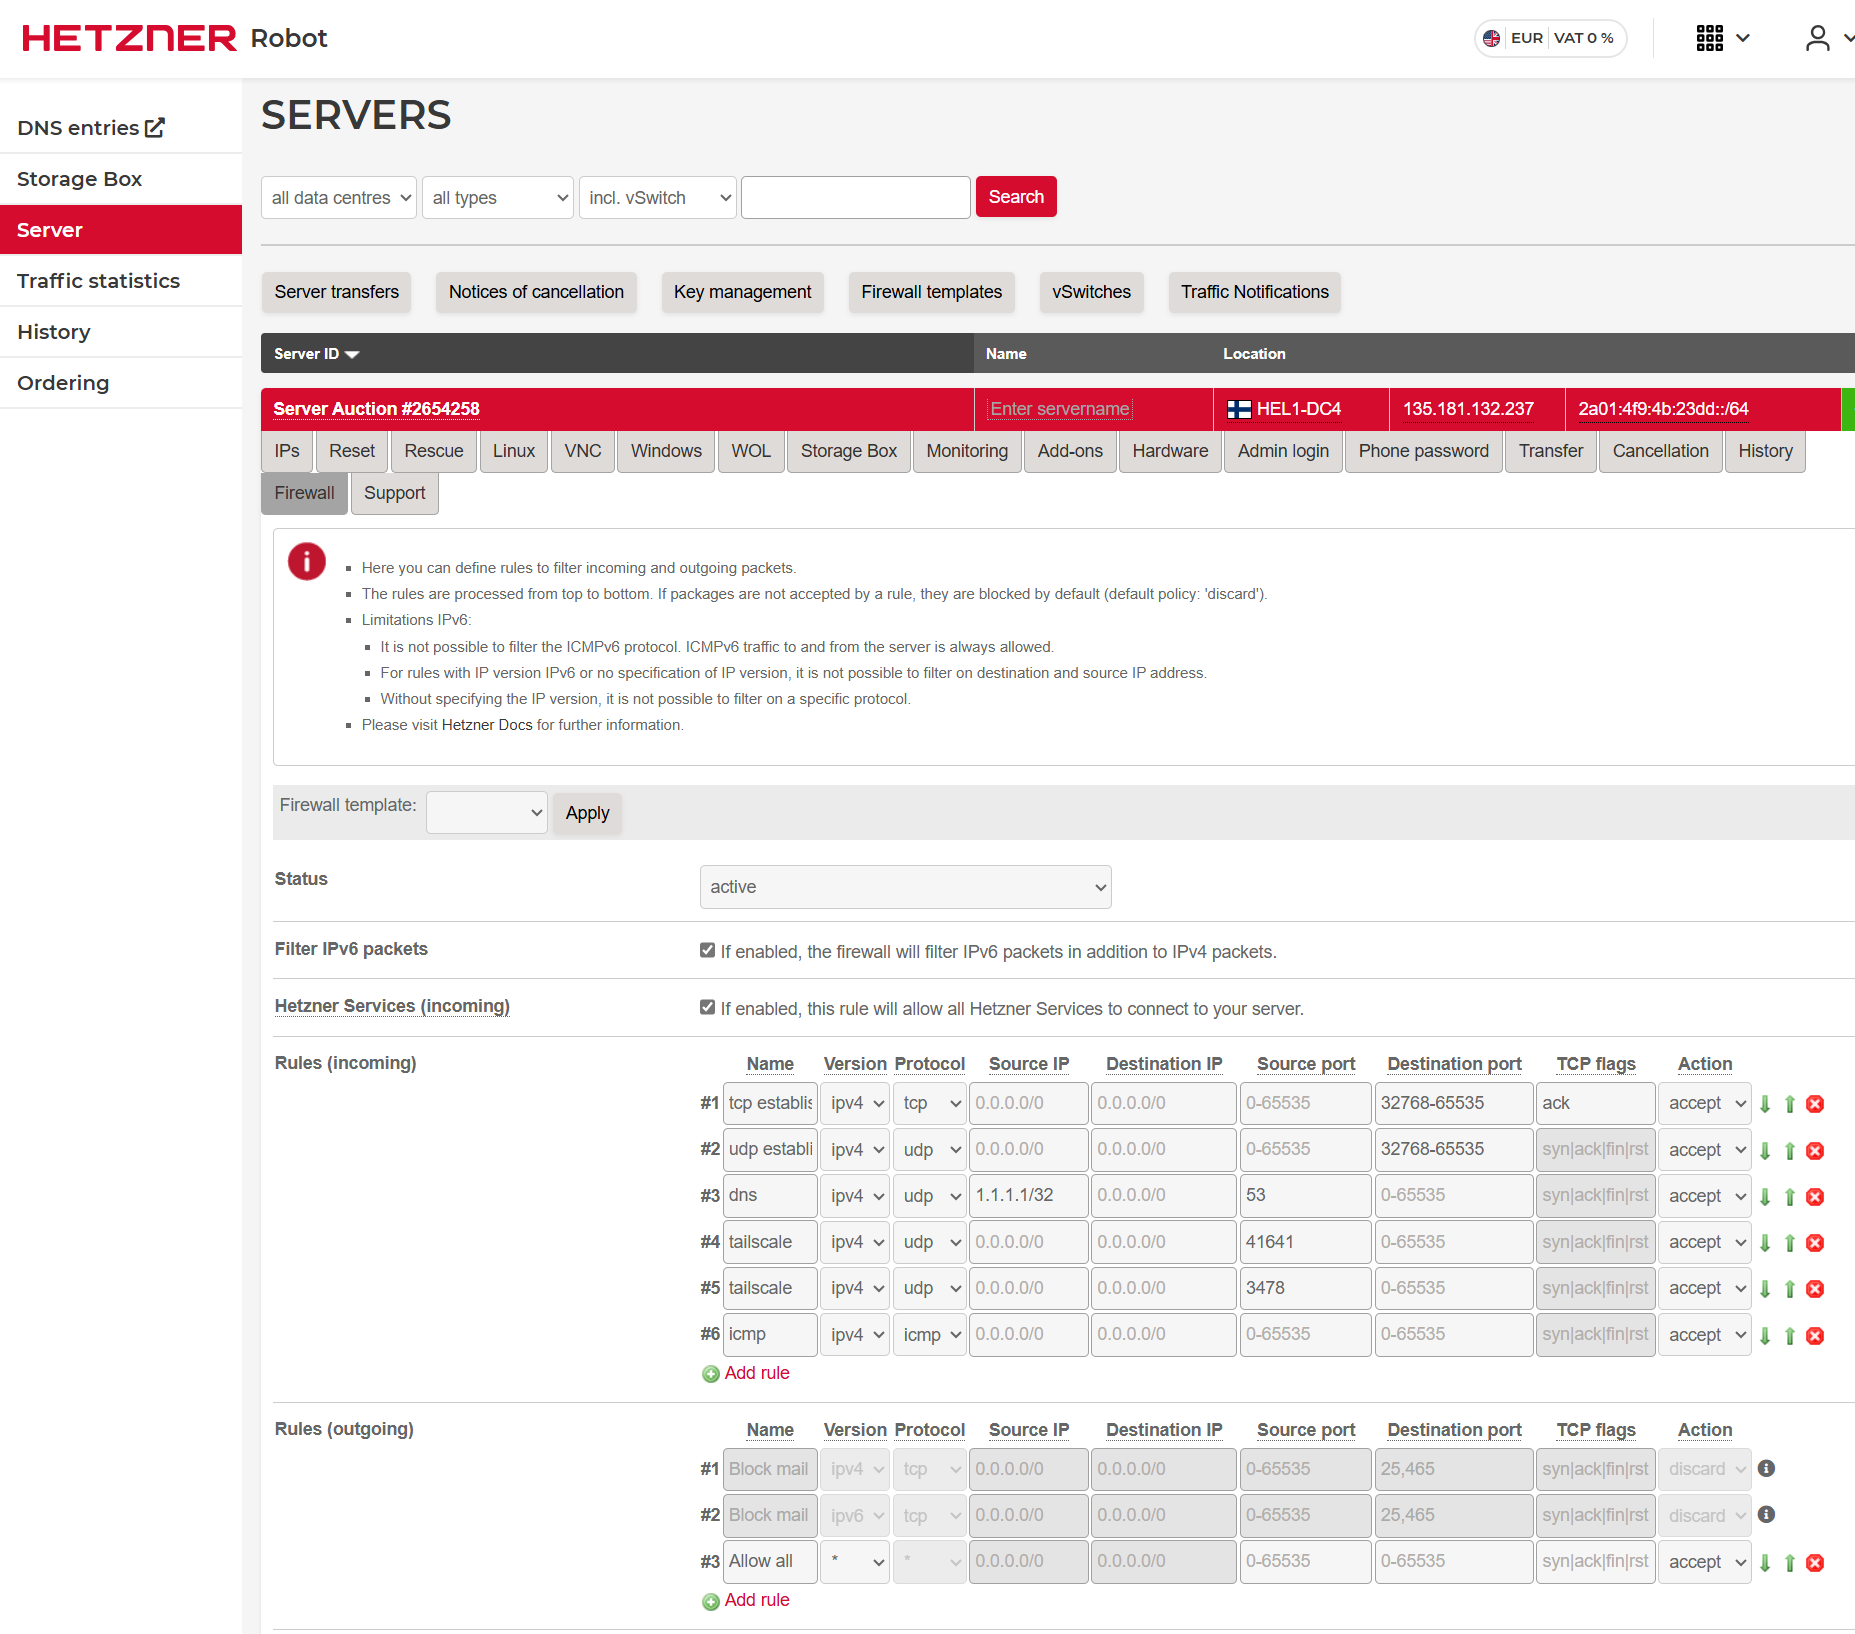
- Hetzner implements a network firewall that can be configured in: Hetzner Online GmbH - Robot
- The firewall is stateless so it needs to be configured accordingly.
- The current configuration allows
- ephemeral ports from anywhere (udp/tcp)
- dns from 1.1.1.1 port udp/53
- source udp/41641 and source udp/3478 for tailscale
- icmp for allowing ping from internal VMs
- Note: proxmox iptables only allows incoming tcp/22 to proxmox host from external interface
Proxmox configuration
- UI: https://10.2.42.1:8006
- SSH on 135.181.132.237:22
- credentials in 1password
General
Create LVM thin volume:

Install KSM tunned for memory deduplication
Enable automatic upgradeEnable TRIM in LVM
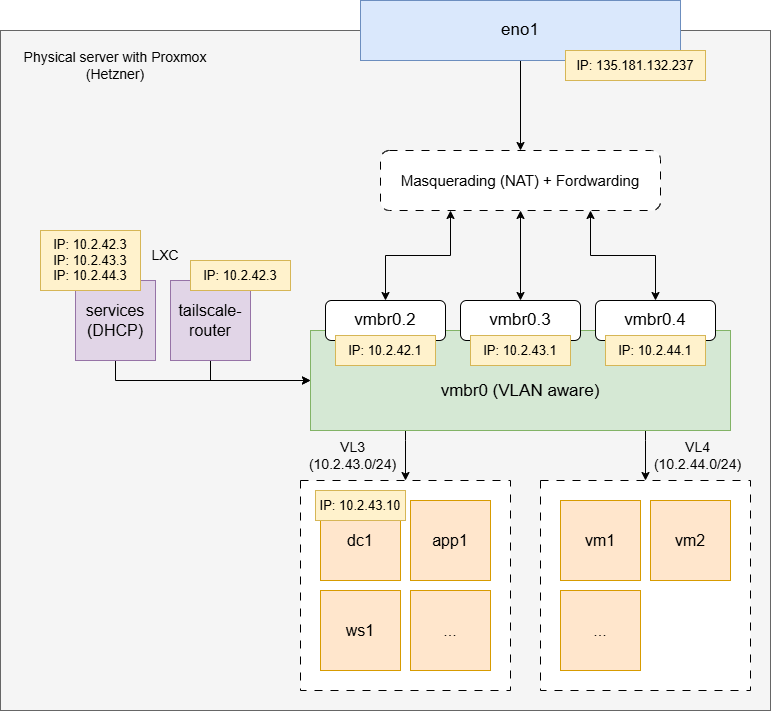
Network 🛜
The lab1 network is setup like this: - VL2 - management: Proxmox 22 and other management ports can be accessed from here, including the management interfaces of tailscale and dhcp LXC. - VL3 - Windows Lab: Main windows lab - VL4+n: Others labs that can be created on demand.
Notes:
- NAT and forwarding is done at the Hypervisor level.
- iptables rules are created to make sure no management port can be reached from the labs.
- All networks within the lab are routable from tailscale.
Network configuration:
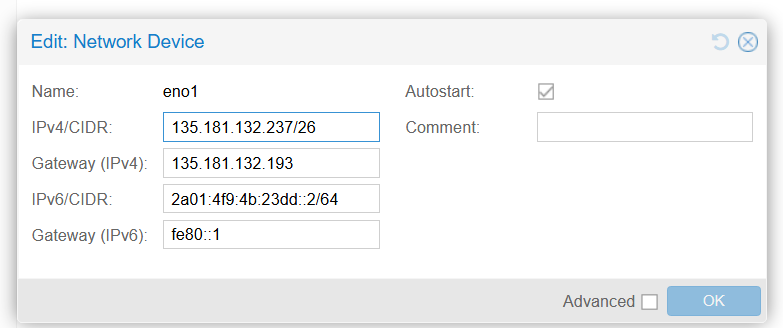
Configure bridge and VLAN using Proxmox interface, main interface:
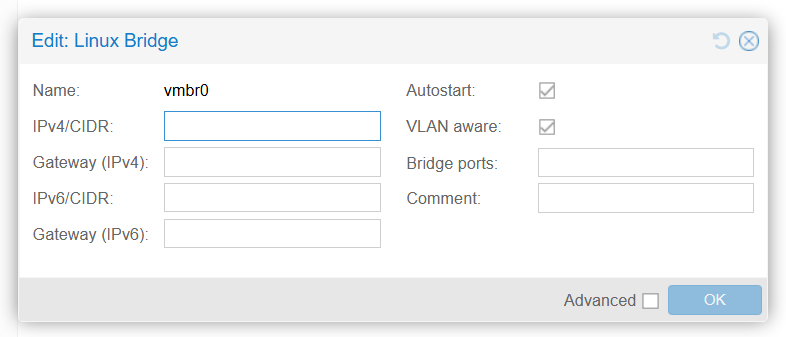
 Bridge:
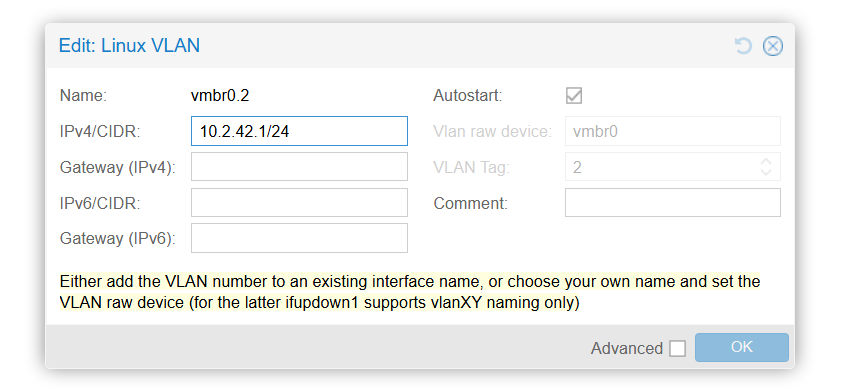
 One VLAN interface, for example vlan2:
Final network
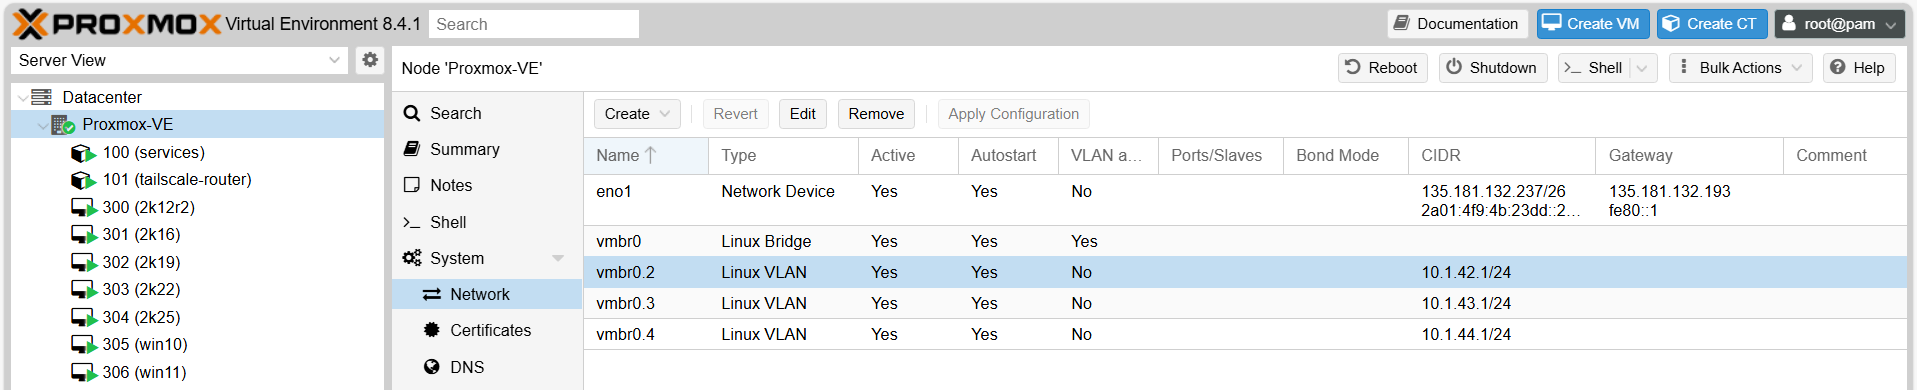
For reference, final /etc/network/interfaces:
iptables:
- Install iptables-persistent and make sure iptables are restored after reebooting.
LXC, *
Notes: - For all LXC containers in Proxmox
Install unattended upgrades and reconfigure
Edit /etc/apt/apt.conf.d/50unattended-upgrades:
LXC, services
Notes:
- Proxmox container with dhcp server (kea)
- You can access from proxmox host with pct enter 101
- Has a interface on every network
Create container based on Debian bookworm and configure networks accordingly:

Install kea with apt install kea-dhcp4-server. Edit /etc/kea/kea-dhcp4.conf:
Install firewall and configure to prevent mgmt access from lab vlans
LXC, tailscale-router
Notes:
- Proxmox container with tailscale router
- You can access from Proxmox host with pct enter 102
- It gets routed these networks: 10.2.40-49.0/24
- tailscale got onboarded with arnau.ortega@amberwolf.com
Create container based on Debian Bookworm and set network accordingly:

Install tailscale, follow instructions from webpage. Then register tailscale router with:
ethtool and ten create /etc/systemd/system/udpgroforwarding.service:
Tenant Configuration
TODO
Windows labs
3 labs: - Main lab, weekly reverted - SCCM lab (ludus deployed) - Forest lab: (TODO)
Guide: deploy new server checklist
Deploy a new VM in the Windows lab is done by cloning an existing template, this way the VM is bootstrapped with the necessary config and software installed.
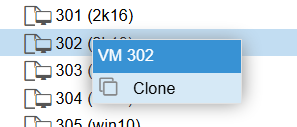 Then depending if the machine is a windows server server or a workstation follow the appropriate steps:
Servers (win2k*)
(during boot)
- Setup Administrator:Pass123!
(after boot) - Assign static IP - Change hostname - Enable RDP connection to manage this computer - Activate server with license, you may need to use this command before and then activate:
aw-computers OU. For GPO policies.
- Set Location and timezone:
- finally, change CPU and RAM to something acceptable if necessary. Changes won't be applied until the VM is shutdown (shutdown, not reboot)
- Check if "Start at boot" (Proxmox VM Options) needs to be enabled.
- Check ansible from Proxmox connectivity for revert, update, snapshot.
Workstations (win10, win11)
(during first boot wizard)
- For win11, use sift+f10 and then oobe\bypassnro trick to bypass the need for a cloud account. Remember to do ipconfig /release when the server rebooted after the second command.
- username: explorer2:Pass123! (explorer was created before the template)
- After you sign in with explorer2, to go computer management and enable Administrator account, set password Pass123! and set password never expires
- Then sign in with Administrator and delete explorer and explorer2 users.
(after booting up)
- Assign static IP
- Enable RDP connection to manage this computer
- Activate Windows
- Change hostname
- reboot (yes, reboot)
- Join domain, if necessary
- Add computer object to the aw-computers OU. For GPO policies.
- Set Location and timezone:
winrm.cmd quickconfig
- finally, change CPU and RAM to something acceptable if necessary. Changes won't be applied until the VM is shutdown (shutdown, not reboot)
- Check if "Start at boot" (Proxmox VM Options) needs to be enabled.
- Check ansible from Proxmox connectivity for revert, update, snapshot.
Templates
Changes present in all server templates:
- Folder with ACL with FullControl for Authenticated Users at C:\aw_tools
- Software:
- dnspy
- jdk21
- ghidra
- 7zip
- HxD
- System Informer
- Visual Studio Code (System install)
- Windows Kit (only debugging tools installed, windbg)
- Wireshark
- qemu-agent
- Note: the following user-level installed software was installed for explorer but then found out it was not available after sysprep
- burpsuite community
- zoom
Then servers were sysprep. - Note: For win11 bitlocker had to be disabled for C drive and windows wdgets appx package removed
Windows Servers
- Installed Windows 2k* Standard Edition with Desktop experience
- Installed virtio drivers
- User:
Administrator:Pass123! - All options default during installation
- Power Options > High Performance Profile
- Turn off display > never
- IP: DHCP
- Time zone > +1
Win10/Win11
- Installed the corresponding Pro version
- Win11 installed via shift+10
oobe\bypassnromethod - Created user explorer during install
- Power Options > High Performance Profile
- Turn off display > never
- IP: DHCP
- Time zone > +1
Tenant
Best-effort tracklog of all configuration done in the tenant
- Tenant's main domain name: 28670j.onmicrosoft.com. (Ask Julian the meaning behind the domain name)
- Tenant is linked to wolfnest284@outlook.com
- Main GA account: ga1@28670j.onmicrosoft.com
- Created personal accounts for main users + assigned M365 licenses.
- Assigned M365 licenses to plant accounts
Conditional Access Policies (CAP)
- Block On-Premise Animals Accounts Clouds Apps: policy that blocks on-premise accounts with weak passwords (animal accounts) to sign-in to cloud apps. Based on the dynamic group: On-Premise Animal Users
- - Block On-Premise Animals Accounts User Actions: policy that blocks on-premise accounts with weak passwords (animal accounts) to register security informations. Based on the dynamic group: On-Premise Animal Users
- Require MFA: Force MFA on all accounts, except Azure sync account.
Main lab
...
Servers 💻
| Lab | VID | IP | FQDN | notes |
|---|---|---|---|---|
| Main lab | 350 | 10.2.43.10 | dc1-wolfgang.wolfgang.int | Primarly DC 2k19 |
| Main lab | 351 | 10.2.43.11 | ad-connect.wolfgang.int | ADConnect 2k19 |
| Main lab | 352 | 10.2.43.12 | adcs.wolfgang.int | ADCS 2k19 |
| Main lab | 353 | 10.2.43.13 | app1-2k16.wolfgang.int | IIS+MSSQL |
| Main lab | 354 | 10.2.43.14 | app2-2k19.wolfgang.int | IIS+MSSQL |
| Main lab | 355 | 10.2.43.15 | app3-2k22.wolfgang.int | IIS+MSSQL |
| Main lab | 356 | 10.2.43.16 | app4-2k25.wolfgang.int | IIS+MSSQL |
| Main lab | 357 | 10.2.43.31 | ws1-win10.wolfgang.int | win10 |
| Main lab | 358 | 10.2.43.32 | ws2-win10.wolfgang.int | win10 |
| Main lab | 359 | 10.2.43.33 | ws3-win11.wolfgang.int | win11 |
| Main lab | 360 | 10.2.43.34 | ws4-win11.wolfgang.int | win11 (+dev tools, VS, Burp Suite etc) |
| Main lab |
361 | 10.2.43.35 | ws5-win10.wolfgang.int | Crowdstrike |
| Main lab | 362 | 10.2.43.36 | ws6-win11.wolfgang.int | Crowdstrike |
| Main lab | 363 | 10.2.43.17 | app5-2k22.wolfgang.int | IIS+MSSQL, Crowdstrike |
Users 👤
Each user has two versions, for example for bee:
- bee: regular domain user
- bee-adm: domain admin
- In all cases password is Pass123!
| user | ad user |
|---|---|
| arnau | ape |
| jose | bee |
| jake | lion |
| bee | |
| david | cow |
| tiger | |
| elephant | |
| julian | giraffe |
| zebra | |
| kangaroo | |
| darren | panda |
| koala | |
| bear | |
| richard | wolf |
| fox | |
| deer | |
| monkey | |
| gorilla | |
| leopard | |
| cheetah | |
| rhino | |
| hippopotamus | |
| crocodile | |
| alligator | |
| dolphin | |
| whale | |
| shark | |
| octopus | |
| penguin | |
| eagle | |
| owl | |
| parrot | |
| flamingo | |
| tortoise | |
Weekly revert 💪
To avoid Armageddon, the whole "Main Lab" at 3:00 AM every Sunday will: 1. Revert to a snapshot from 1 week ago 2. Boot from there 3. Install updates 4. Shutdown 5. Take snapshot and delete 4 weeks old snapshot 6. Start again
The two cronjobs taking care of that - the first one is to reboot if previous Proxmox updates required so - The second one is a bash script to automate the steps above
Script main_lab_revert.sh:
Setup Install apt packages:
/etc/krb5.conf;
inventory.ini
/etc/hosts/ (list not complete):
win_ping command:
dc1-wolfgang
General
- Install Active Directory Domain Services
- Domain: wolfgang.int
- DSRM password: Pass123!
- Sync with Hetzner time servers. For some reason MS time servers failed even after setting correctly the Hetzner FW.
aw-computers. For GPO policies.
- Created policy Automatic Updates applied to all servers via aw-computers OU.
- Automatic install updates (Local Computer Policy > Computer Configuration > Administrative Templates > Windows Components > Windows Update > Configure Automatic Updates)
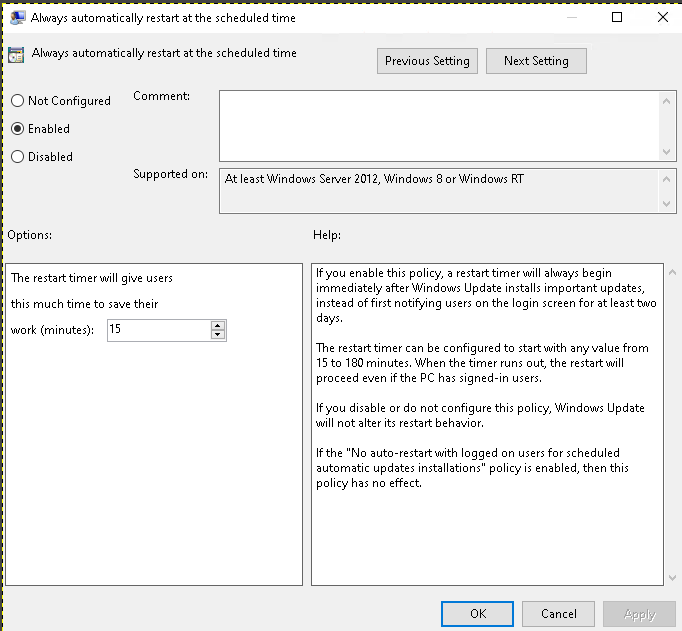
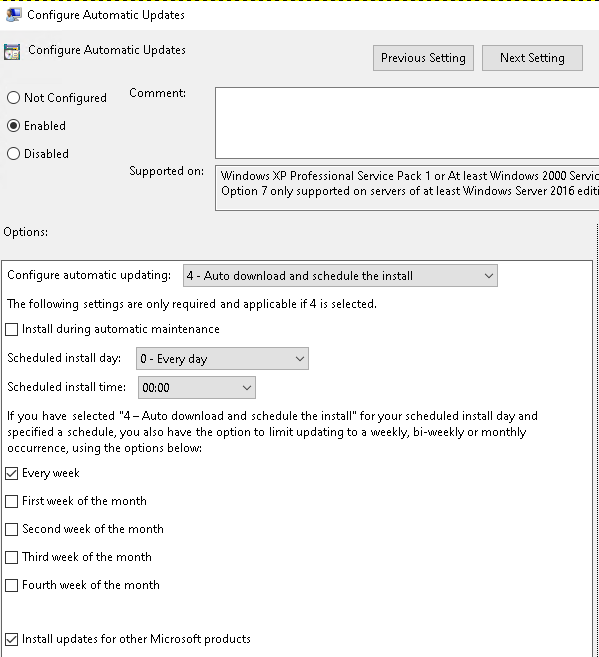 - Always automatically restart (Local Computer Policy > Computer Configuration > Administrative Templates > Windows Components > Windows Update > Always automatically restart at the scheduled time)
 - Create policy
 Allow RDP for domain users applied to all computers via aw-computers OU.
- Enable RDP connections: Computer Configuration -> Policies -> Administrative Templates -> Windows Components -> Remote Desktop Services -> Remote Desktop Session Host -> Connections. Enable "Allow users to connect remotely using Remote Desktop Services" policy.
- Add Domain Users group to members of local group "Remote desktop users", navigate to: Computer Configuration -> Policies -> Windows Settings -> Security Settings -> Restricted Groups. Then Add Group and type "Domain Users", then add "Remote Desktop Users" to "This group is a member of".
- Add UPN suffix ga1@28670j.onmicrosoft.com in "Active Directory Domains and Trusts".
Users
- added company users
- all password Pass123!
- password never expires
- Added plants account. These accounts have a strong password and are allowed to sign-in in cloud services. These accounts are created in a different OU (User Plants) so a dynamic group in azure can correctly segregate them and apply the appropriate CA Policies.
- ansible (for auto update) in Domain Admins
- dev-admin-ws4, regular user but local admin in ws4
- adcs_ndes (for adcs, check its section)
- adcs_ces (for adcs, check its section)
- adcs_mdi_sensors, account for ADCS MSI sensor, check 1pass for creds. Needs to be configured in security.microsoft.com.
SSO roll out
- Created a GPO called SSO Enable only applied to User Plants OU, after enabling SSO in ad-connect server.
- Followed steps here: Quickstart: Microsoft Entra seamless single sign-on - Microsoft Entra ID | Microsoft Learn
Microsoft Defender for Identity
- Added agent according to DOCS
- Added MDI policy applying to DCs
- Follow guide: https://aka.ms/mdi/advancedaudit
- Follow guide: https://aka.ms/mdi/ntlmevents
- Follow guide: https://aka.ms/mdi/npcap
ad-connect
Onboarding on-premise AD to Entra ID
- Install ad-connect agent from Azure portal
- You need to switch to Medium-low for Trusted sites in Internet Options.
- Options:
- Custom settings
- Pass-through authentication
- Onboard with GA1 account.
- Directory: wolfgang.int
- Select: Create new AD Account
- Continue without matching all UPN suffixes to verified domains. This avoid on-premises account with Pass123! to sign in to cloud services.
- Sync all domains and OUs
- Rest of the options leave default
Enable Hybrid Azure AD join
Run the assistant again to configure Hybrid Azure AD join (based on: https://learn.microsoft.com/en-us/azure/active-directory/devices/howto-hybrid-azure-ad-join#managed-domains)
1. Start Azure AD Connect, and then select Configure.
2. In Additional tasks, select Configure device options, and then select Next.
3. In Overview, select Next.
4. In Connect to Azure AD, enter the credentials of a Global Administrator. ga1 was used.
5. In Device options, select Configure Hybrid Azure AD join, and then select Next.
6. In Device operating systems, select "only Windows 10 or later domain-joined devices".
7. In SCP configuration, select
1. Forest: ballpit.int
2. Authentication Service: Azure Active Directory
3. Enterprise Admin: wolfgang\Administrator
8. In Ready to configure, select Configure.
9. In Configuration complete, select Exit.
10. If assistant finish with errors, rerun it. Second time must finish without errors.
11. Make sure the DC has extra UPNs for the domain you want to use to sign in. Needs to be a routable domain for accessing azure resources.
12. Reboot server
Enable Desktop SSO
Followed steps here: Quickstart: Microsoft Entra seamless single sign-on - Microsoft Entra ID | Microsoft Learn
- Start Azure AD Connect, and then select Configure.
- In Additional tasks, select Change users sign-in, and then select Next.
- In Overview, select Next.
- In Connect to Azure AD, enter the credentials of a Global Administrator. ga1 was used.
- Select Pass-through authentication and check Enable single sign-on.
- Next and then rollout SSO by applying GPO to plants users, check notes there.
adcs
- Join domain
- Install adcs
- Role services:
- Enable all (certificate authority, certificate enrollment policy web service, certificate enrollment web service...)
- Configure ADCS installation
- Select role services to configure: Certification authority
- Enterprise CA
- Root CA
- Default private key parameters
- Default common name for the CA (wolfgang-ADCS-CA)
- default Validity period
- rest options default
- Select role to configure: Certificate enrollment Web Services
- Authentication type: Windows integrated authentication
- Specify services account
- Created domain user account called
adcs_ces:Pass123! - Add it to the local adcs group
IIS_IUSRS net localgroup /add IIS_IUSRS "wolfgang.int\adcs_ces"- Specify Server auth certificate
- Create new cert using "Computer Certificates" based on the "Computer" template using MMC
- The certificate is called, adcs.wolfgang.int
- Created domain user account called
- Role to configure: the rest (next, next, next...)
- Service account for NDES
- created domain user account called
adcs_ndes:Pass123! - Add it to the local adcs group IIS_IUSRS
net localgroup /add IIS_IUSRS "wolfgang.int\adcs_ndes"
- created domain user account called
Vulnerable templates - User_esc1: Subject Name > Supply in the request - User_esc2: Extensions > Application Policies > Any Purpose - User_esc3: Extensions > Application Policies > Certificate Request Agent - User_esc3: - Extensions > Application Policies > Client Authentication - User_esc3_schema2 - Issuance Requirements > This number of authorized signatures: 1 - issuance Requirements > Application policy > Certificate Request Agent - User_esc4: Security > Add ACL > Domain Users: Write
Microsoft Defender for Identity
- Added agent according to DOCS
- Follow guide: https://aka.ms/mdi/CAAuditing
- Don't forget to add the adcs_mdi_sensor, more details in dc1-wolfgang notes.
app*
- Installed IIS (via role, all default, no further configured)
- Installed MSSQL Server Developer edition 2k16, 2k19, 2k22 to the corresponding Windows Server versions.
- Mixed authentication configured
- Setup
saaccount with:sa:Pass123! - Added local
Administratoruser to the database admins.
- Installed SSMS (For 2k16, a .NET runtime pack had to be installed)
ws*
- Enable RDP connection to manage this computer
- Join domain
winrm.cmd quickconfig(yes to everything)- Enabled Administrator account, set password
Pass123!and password never expires - Remove explorer and explorer2 users
ws4-win11
- Mimics developer workstation.
- Added
aw-local-devto administrators Software: - Visual Studio Community
- Burp suite Community
- Zoom
SCCM lab (via ludus)
Lab created in a VM where a second Proxmox deployment is created (yes, Proxmox within Proxmox). More info about ludus: - Synzack/ludus_sccm: An Ansible collection that installs an SCCM deployment with optional configurations. - Install Ludus | Ludus
TODO - [ ] Ludus SCCM lab deployment ended in a fail state. Seems all is fine except workstation was not onboarded to SCCM.
Servers 💻
| Lab | VID | IP | FQDN | notes |
|---|---|---|---|---|
| SCCM lab | ludus-lab, 106 | 10.3.10.10 | dc01.ludus.domain | dc |
| SCCM lab | ludus-lab, 107 | 10.3.10.11 | workstation.ludus.domain | TODO: deployment failed, not configured |
| SCCM lab | ludus-lab, 108 | 10.3.10.12 | distro.ludus.domain | |
| SCCM lab | ludus-lab, 109 | 10.3.10.13 | sql.ludus.domain | |
| SCCM lab | ludus-lab, 110 | 10.3.10.14 | mgmt.ludus.domain | |
| SCCM lab | ludus-lab, 111 | 10.3.10.15 | sitesrv.ludus.domain | Configuration Manager is here |
| ### Users 👤 | ||||
| Note: remember deployment of workstation failed and domain creds won't work, use the local ones |
Domain creds
- domainadmin:password (SCCM admin, Domain Admin)
- domainuser:password
Local creds
- localuser:password
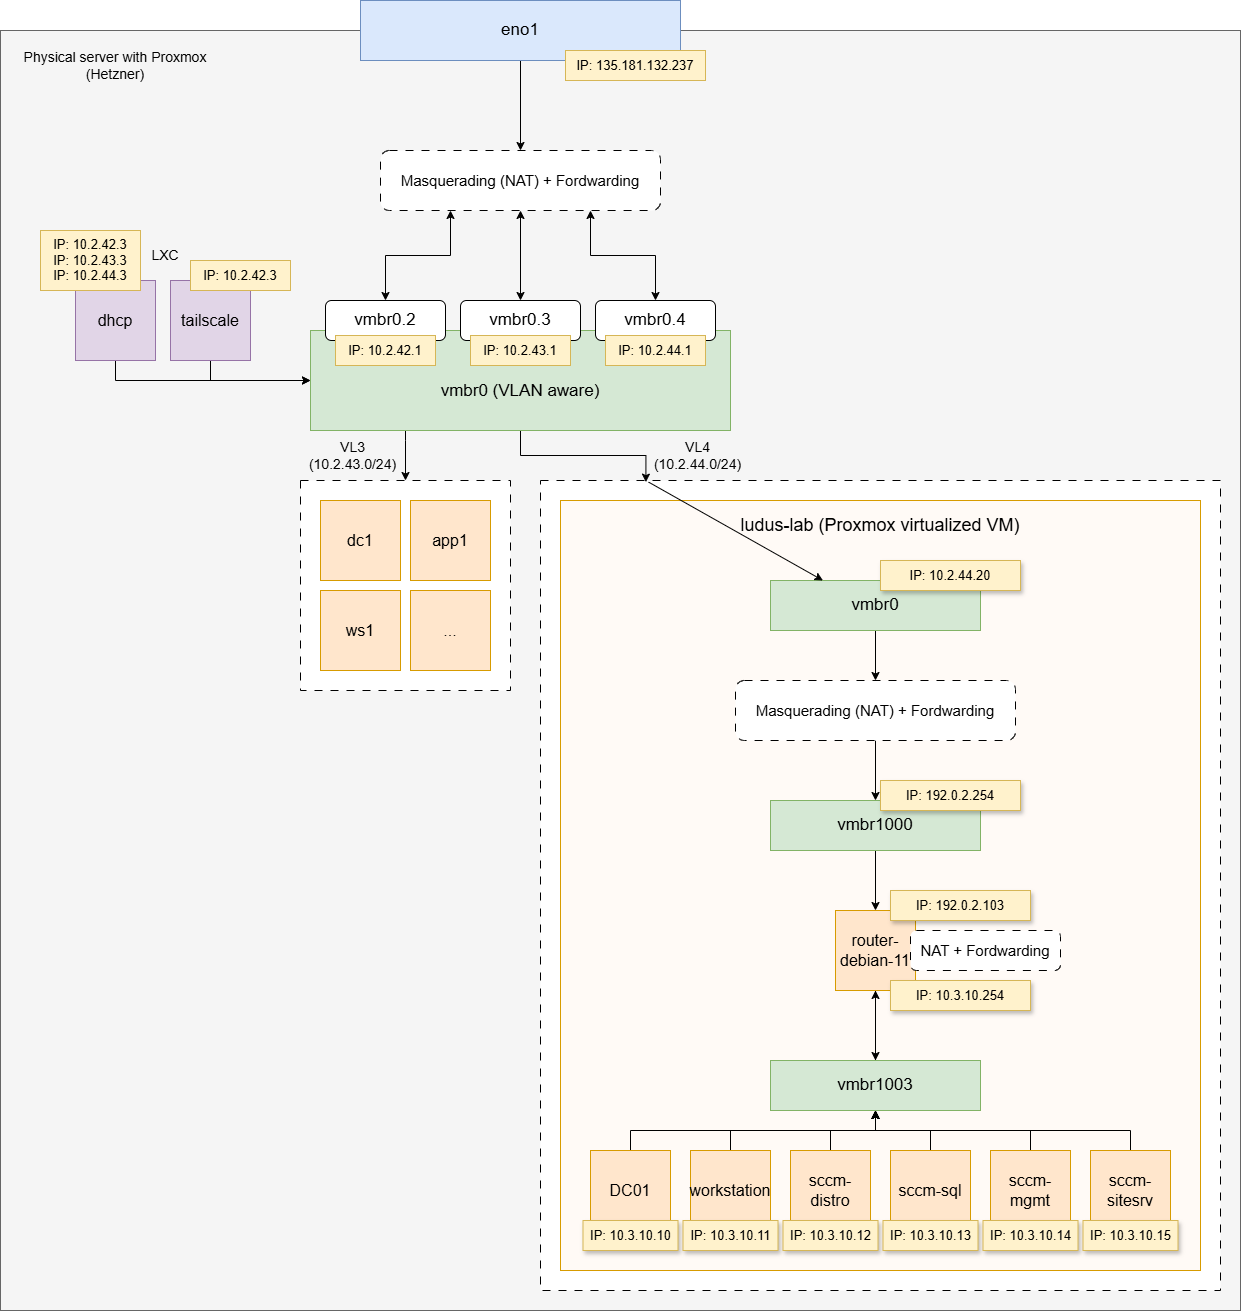
Network diagram 🛜
Steps
- Creating fat VM with 32G+1TB
- Install Proxmox, all default
- Install ludus following official guide except:
- Change VM store to local-lvm
- Change format to raw
- Modify the following settings
- proxmox_local_ip: 10.2.44.20
- proxmox_public_ip: 10.2.44.20
- proxmox_gateway: 10.2.44.1
- reserved_range_numbers: [2], new users start on id 3 which will create machines IPs like 10.3.10.10,11,13... etc. Otherwise it will create a network on 10.2.0.0/16 which will conflict with 10.2.42.0/24 used by the main Proxmox installation.
- Create ludus admin user:
ludus templates build
- Then install SCCM ludus range and deploy, follow steps on guide linked above.
Notes about the lab:
- Proxmox instance at: https://10.2.44.20:8006 (SSH also available like a regular Proxmox deployment)
- Users, domain (ludus.domain):
- domainadmin:password (SCCM admin, Domain Admin)
- domainuser:password
- SCCM console on sccm-sitesrv server.
- To perform operation on the ludus server you need the AWLudusAdmin key or the root key. Check 1password. Use them by exporting a variable:
- AWLudusAdmin: export LUDUS_API_KEY='AW...'
- Root: export LUDUS_API_KEY='ROOT...
- Useful commands:
- ludus range status
- ludus range list
- ludus range logs -f
- ludus templates list
- ludus templates status
Forest lab (TODO)
TODO
CrowdStrike
Installation
- Installing CrowdStrike on app5-2k22, ws5-10 and ws6-win11.
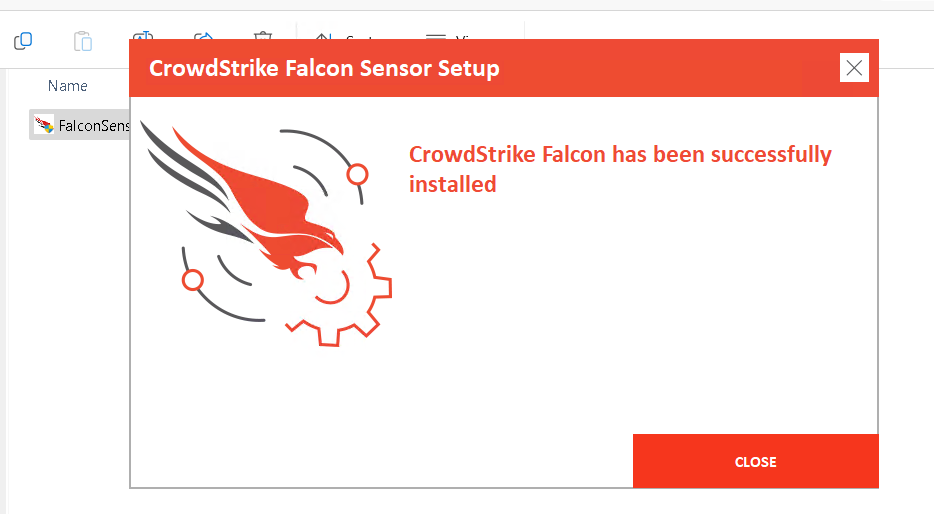
- Download the binary from the CS portal, double click, enter customer ID and done
Changes to policy: Default (Windows)
- Prevention policies: Modified Default Windows
- All enabled and set to max protection
- Firewall policies
- no change
- USB policies: Modified Default Windows
- Enhanced file metadata collection: On
- End-user notifications: On
- Sensor update policies
- no change
- Response policies
- no change
- Falcon icon policies: Modified Default Policy Windows
- Show Falcon icon: On