Havoc C2
This page contains documentation for using and customising the Havoc C2 Framework.
Internal Fork
We maintain our own internal fork of the official Havoc repo. This contains various enhancements and patches to remove IOCs etc.
You can find the fork here: * https://git.ts.amberwolf.com/RedTeam/Havoc-fork
Profiles
You can find a repo here with "golden profiles", which are known good and have common IOCs taken care of. * https://git.ts.amberwolf.com/RedTeam/havoc-profiles
Artifact Scanning
We have a repo here which scans the latest Havoc artifacts nightly against Elastic and Defender: * https://git.ts.amberwolf.com/RedTeam/artifact-scanning
Please ensure you have read any notes under the "Detection Notes" section of the README, and noted any recent detections in the yara_scan_results.txt file before deployment.
Docker Images
We maintain two Docker images which are based off of the internal Havoc fork.
These are:
havoc- this is the Docker image for the Havoc teamserverhavoc-xrdp- this is an Ubuntu XFCE based image that provides a copy of the Havoc client over XRDP
The Docker files and source code for the above images can be found in the red-team-infra repo.
These images are built using Gitea actions, and published to both the Gitea container registry and the aw-store S3 bucket.
Havoc Image
The havoc image also contains some extra features to assist with setting up a Havoc teamserver. This includes a copy of the pyaotl Python library, which includes an API and scripts for performing tasks related to Havoc profiles, such as providing c2lint functionality, as well as automatic Traefik profile generation.
The following options are available for the havoc container. These are exposed via environment variable options. By setting these environment variables, you can configure the respective functionality within the Havoc container:
| Environment Variable | Description | Default | Example | Notes |
|---|---|---|---|---|
HAVOC_PROFILE |
Defines the path for the Havoc profile that is used on startup. | If no profile is specified, the default profile (at /opt/Havoc/data/havoc.yaotl) is used. |
/data/example.yaotl |
The value specified in this setting may refer to a volume mount. The /opt/Havoc/data directory itself may also be volume mounted so that the teamserver.db (and other files) are kept between deployments.The entrypoint.sh script will detect when this directory is volume mounted, and copy the default profile there, if neccessary.After changing this setting you will need to restart the container. |
HAVOC_USERS_JSON |
Contains a base64 encoded JSON formatted structure which defines any users which should always be added to the Havoc profile. Any users defined here will be added to the Operators block in the Havoc profile by the startup script, regardless of the original content of the profile. |
If no value is specified. No users will be added to the profile on startup. | W3siNXBpZGVyIjogInBhc3N3b3JkIn1d |
This setting is designed to allow you to specify a primary user that will always be able to login to the Havoc server without manually modifying the profile. It is used by Rundeck to configure the primary Havoc user account. After changing this setting you will need to restart the container. |
C2LINT_NO_FIX |
This setting tells the c2lint tool not to fix any issues automatically. |
0 or false |
1 or true |
This setting allows you to turn off automated fixes such as changing weak passwords or correcting common OPSEC issues. As this setting provides security benefits, it's recommended to keep it set to 0 or false. |
HAVOC_DEBUG_DEV |
This setting controls the --debug-dev flag which is passed to the Havoc server command. This mode provides increased debugging output for Demon by compiling paylods with debugging enabled. |
0 or false |
1 or true |
You typically want this off unless you're debugging. That is because this will print verbose output to the console of the demon executable (not the server), which would be a spectacular OPSEC fail! |
HAVOC_VERBOSE |
This setting controls whether --verbose flag is passed to the Havoc server command. |
1 or true |
0 or false |
There is no detrimental effect to having this turned on, other than it creating more output in the docker logs. It is recommended to keep this turned on to see what is happening on the teamserver. |
HAVOC_DEBUG |
This setting controls whether the --debug flag is passed to the Havoc server command. |
0 or false |
1 or true |
There is no detrimental effect to having this turned on, other than it creating a lot more output in the docker logs. However, you will typically want to leave this turned off. |
There are also a number of environment variable settings which relate to the configuration of Traefik Profile generation. When these are set, the container will automatically parse the configured Havoc profile to extract out the URLs and User-Agent values (using pyaotl), and create dynamic Traefik configuration file(s). The idea of this feature is that it can be used in tandem with a local Traefik redirector container. Whenever the Havoc container is restarted, the pyaotl script is run in order to generate a new Traefik config that reflects any changes to the Havoc profile (such as adding new URLs). To use this feature, you need to have the Traefik configuration directory volume mounted in both the Havoc and Traefik containers, so that it can be read by Traefik and written by Havoc.
It is recommended to set the
depends_onproperty of the Traefik container (when usingdocker compose), so that the Traefik container depends on the Havoc container being started. This allows the Havoc container to generate the requisite Traefik configuration file before the Traefik container starts.
The following settings control the Traefik profile generation feature:
| Environment Variable | Description | Default | Example | Notes |
|---|---|---|---|---|
TRAEFIK_CONFIG_DIR |
This setting defines the directory where the Traefik configuration files will be written to. | None | /opt/traefik |
This directory should be a volume mounted directory which is also mounted in the Traefik container. Havoc will write the traefik.yml and dyanmic.yml configuration files here on startup.If no value is specified, then all Traefik settings are ignored. |
TRAEFIK_SUBDOMAIN |
This setting defines the subdomain that the redirector is hosted on. It is used to generate SSL certificates using Route53 and LetsEncrypt. It is also used to generate a rule based on the host header. |
None | www |
If no value is specified, then all Traefik settings are ignored. |
TRAEFIK_DOMAIN |
This setting defines the domain that the redirector is hosted on. It is used to generate SSL certificates using Route53 and LetsEncrypt. It is also used to generate a rule based on the host header. |
None | example.com |
In order to make use of the automated certificate generation, the docker host must have an IAM profile which allows writing to the Route53 zone specified by the TRAEFIK_DOMAIN setting. If you are running an instance in the AmberWolf AWS account, you can apply the r53-ops-zone-role instance profile to your EC2 instance, which provides these permissions.If you are running locally, you can supply the AWS_ACCESS_KEY_ID, AWS_SECRET_ACCESS_KEY and AWS_REGION values. If neither a suitable IAM role or access keys are found, then a default self-signed certificate is generated instead - which is suitable for debugging/testing. |
TRAEFIK_DEFAULT_URL |
This setting defines where Traefik should direct requests that do not match the Havoc profile traffic, e.g. web-crawlers etc. For example, proxying to a fake 404 page, or a legitimate website. | None | http://test.example.com |
If the request doesn't match the generated rules for Havoc C2 traffic, then the request will be forwarded to this URL instead. Note that the original path is kept, so you only need to provide the protocol and domain. If you supply a URL path in your URL, the path will be ignored in forwarded requests. This can be used in a docker compose project to have non-matching requests forwarded to an Nginx container, serving a 404 page, for example. If no value is specified, then all Traefik settings are ignored. |
TRAEFIK_PROXY_URL |
This setting defines the URL that matching requests (i.e. C2 traffic) will be forwarded to. This is typically the URL to your Havoc listener. | None | https://havoc |
If you are running both the Havoc and Traefik containers inside the same Docker network, then this URL can point to the hostname of the Havoc server. Note that just like the default URL setting, you do not need to provide a path here, and if you do, the path will be ignored. Remember to set the right protocol here. For example, if your Havoc listener is listening on HTTP on port 8080, then this would be http://havoc:8080 instead.If no value is specified, then all Traefik settings are ignored. |
By default, when the Havoc container starts, it will automatically run the following steps:
- Detect if the
/opt/Havoc/datadirectory has been volume mounted. If so, it will setup the neccessary symlinks to support this. - Detect if the
HAVOC_PROFILEvariable is set. If its missing, the default profile at/opt/Havoc/data/havoc.yaotlis used instead. - Run the
pyaotl add_operatorscommand in order to add any users specified in theHAVOC_USERS_JSONenvironment variable, to the Havoc profile. - If all of the required Traefik settings are set, then generate dynamic Traefik configuration files and place these in the path specified by the
TRAEFIK_CONFIG_DIRsetting. - Run the
pyaotl c2lintcommand. This will print warnings about any issues found, and if theC2LINT_NO_FIXsetting is disabled, automatically fix any issues in the Havoc profile. - Run the
havoc servercommand to start the Havoc server. Depending on the settings, this may run with various debug or verbosity flags.
However, it is also possible to override the default command, for example if you want to enter a bash prompt in the container:
Havoc XRDP
The havoc-xrdp Docker image provides an Ubuntu desktop environment, which can be accessed remotely via RDP. The container contains a built copy of the (forked/patched) Havoc client in /opt/Havoc.
The container supports multiple users and user accounts, meaning that multiple operators can run their own Havoc client on their own desktop at the same time.
Configuring User Accounts
User accounts can be configured in two ways. Firstly, they can be specified on the command line via docker run or the COMMAND setting when using Docker Compose. Each user takes three arguments, which are: <username> <password> <sudo: true|false>.
For example, to add the user rich with the password Hunter2 and sudo access, you'd run something like this:
The second way that users can be defined is by adding them to the /etc/xrdp/users.list file. This file does not exist by default, but you can create it and volume mount it in your container.
The file takes the following form, whereby entries are supplied with one user per line, and each setting is separated by a : character. The columns follow the same format as the command version, i.e. <username>:<password>:<sudo: yes|no>:
When the container starts, the users.list file is checked and each entry is processed. If the user already exists, the password and sudo settings will be updated for the account. If they do not already exist, they will be added. Note that this can also be used to reset your password if you've forgotten it.
A shortcut script is also placed on each user's desktop which starts the Havoc client.
To access the container, you can use the built-in Windows RDP client. When prompted for credentials, use the username and password you configured above:

Note that copy and paste is supported, both for text and files, as well as drive redirection. This tends to be as reliable as Windows is, so you may also wish to volume mount a shared directory, such as /shared to allow you to get files out if copy/paste stops working.
Example Docker Compose
The following section demonstrates how the above concepts can be used in a Docker Compose project, with a Traefik redirector, and nginx container to handle non-matching requests:
docker-compose.yml:
You can also view the tags on the packages page for each image on Gitea.
Running the Containers
For testing purposes you can run the havoc and havoc-xrdp containers locally. As desribed above, these containers are built automatically by Gitea and published to the Gitea container registry. If you are testing from the Tailscale network, you can pull these directly from Gitea using the following commands
You should now see these containers listed with docker image ls (or under Images in Docker Desktop):
You can run these using docker run, or with Docker Compose.
For example:
Since in the above example we didn't provide any environment variables, the default settings are being used. This means that the default Havoc profile will also be used, which includes a number of default accounts. Since these accounts are configured with weak passwords, the c2lint script will detect this and reset the passwords to a random value.
To retrieve the password, you can run docker logs:
Note we also mounted the c:\temp directory to /shared on the XRDP container (with -v C:\temp:/shared), so that we can share files between the host and the container (without RDP clipboard/drive sharing).
We also mapped port 3390 on the host to 3389 on the XRDP container (with -p 3390:3389), so that we can RDP to localhost:3390 (since 3389 might be taken on a typical Windows host).
Furthermore, we mapped 443 to 443 on the host (with -p 443:443). This allows us to use the host IP as the callback IP when setting up the listener in Havoc.
Note that we did not set a hostname or shared network for the containers. This means the containers can't route directly to each other using their hostnames, but instead you can specify the host's IP address to log into the Havoc server from the XRDP container, by specifying the host's IP address. This is possible since we mapped port 40056 on the host to the Havoc container (with -p 40056:40056). For a production deployment (for example, using Docker Compose), it is better to use a shared network and log in to the Havoc server using it's hostname.
We also did not volume mount the /opt/Havoc/data directory. This means that Havoc's data, such as the teamserver.db database file will be ephemeral. This ok for testing but for production usage you will want to volume mount this instead.
Automated Deployment with Rundeck
This section details how to install a Havoc server and client using Rundeck.
Rundeck automates the process of spinning up an EC2 instance, deploying the havoc and havoc-xrdp containers, as well as any supporting containers such as Nginx and Traefik, and configuring the neccessary settings, including IAM profiles and DNS for production Havoc deployments.
To get up an running with Rundeck:
First spin up an Ubuntu EC2 instance using this Rundeck job.
With regards to instance size, you can use any instance size that is t3.micro or larger. Whilst t3.micro appears to be suitable during testing, you may find that with lots of C2 traffic or multiple XRDP users, you may need to increase the size to something like a t3.medium. Note that the main resource bottleneck seems to be when compiling payloads, however this means that payloads take a little longer to generate on smaller instances, but is otherwise perfectly usable.
You can choose whether or not deploy to the public or private subnet, as well as deciding whether or not you require an Elastic IP, or if a regular public IP will suffice.
Typically, for the subnet option:
- If you are running a test deployment, choose:
private - If you are running a production deployment, but don't require a local redirector (i.e. you're going to run another redirector instance), choose:
private - If you are running a production deployment, and require that the public IP does not change if the instance is stopped/started, choose:
public-with-elastic-ip - If you are running a production deployment, and don't plan to stop/start the instance, or need the IP address to change if you do, choose:
public
Your Rundeck settings will look something like this.

Once the job is completed, you will see it available in the nodes page, which makes it available to install Havoc on.
To install Havoc, there are two different jobs to choose from:
- Install Havoc C2 - This job configures the server with
havocandhavoc-xrdpcontainers, but does not configure a local redirector. Typically you will want to use this job if you are deploying to the private subnet. It can be used for testing, or for scenarios where you plan to install a redirector on another host (which proxies traffic to this Havoc instance). For example, using the Traefik Redirector job. - Install Havoc C2 (with Local Redirector) - This job configures the server with
havocandhavoc-xrdpcontainers. It also deploys a Traefik redirector container, and an Nginx container to handle non-matching requests. This job also takes care of setting up DNS entries and configuring the instance with the necessary IAM profile in order to automatically generate SSL certificates with Route53/LetsEncrypt. This job will only list available instances in the public subnet.
The following sections detail the options for each of the above jobs.
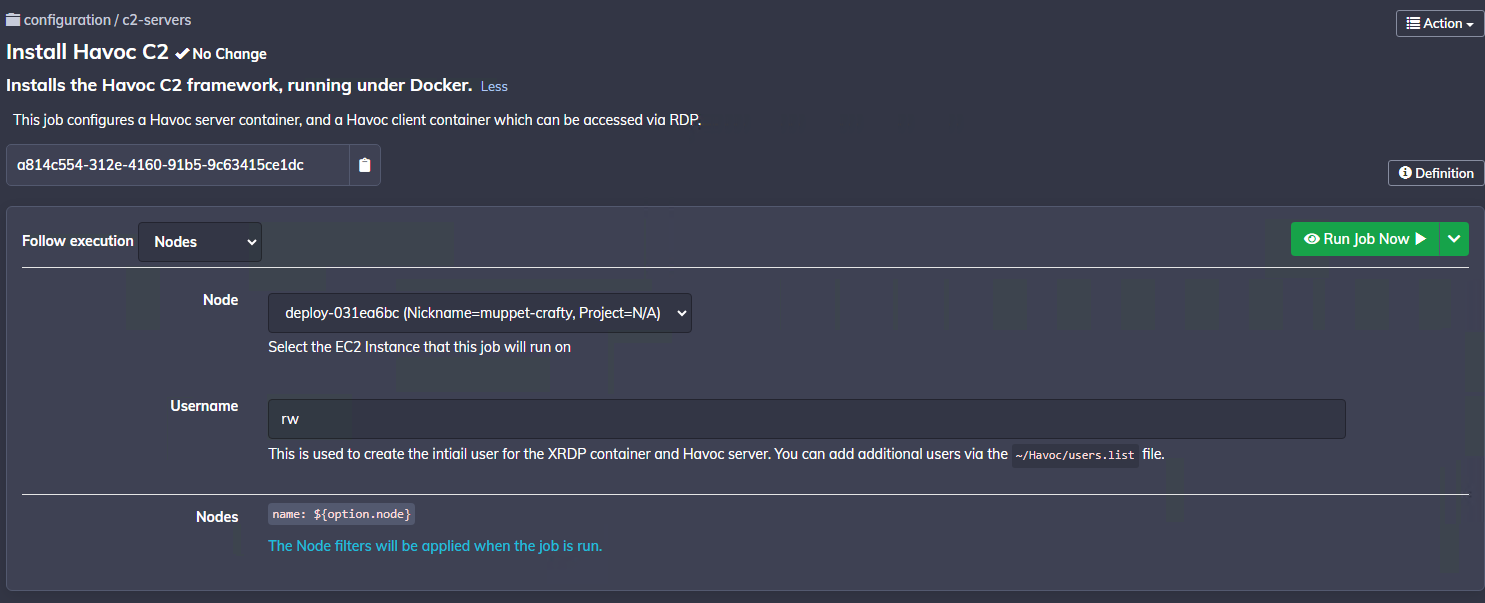
Install Havoc C2 Job
When running the Install Havoc C2 job you will be prompted with the following form. Choose your EC2 instance that you created earlier.
Only one user-configured option is required here. Simply set a Username value, which is used to generate a user account for the XRDP container, as well as the primary operator account for the Havoc Profile (configured using the HAVOC_USERS_JSON setting described previously).
Note that once the deployment has completed, you can add additional users via the ~/Havoc/users.list file.
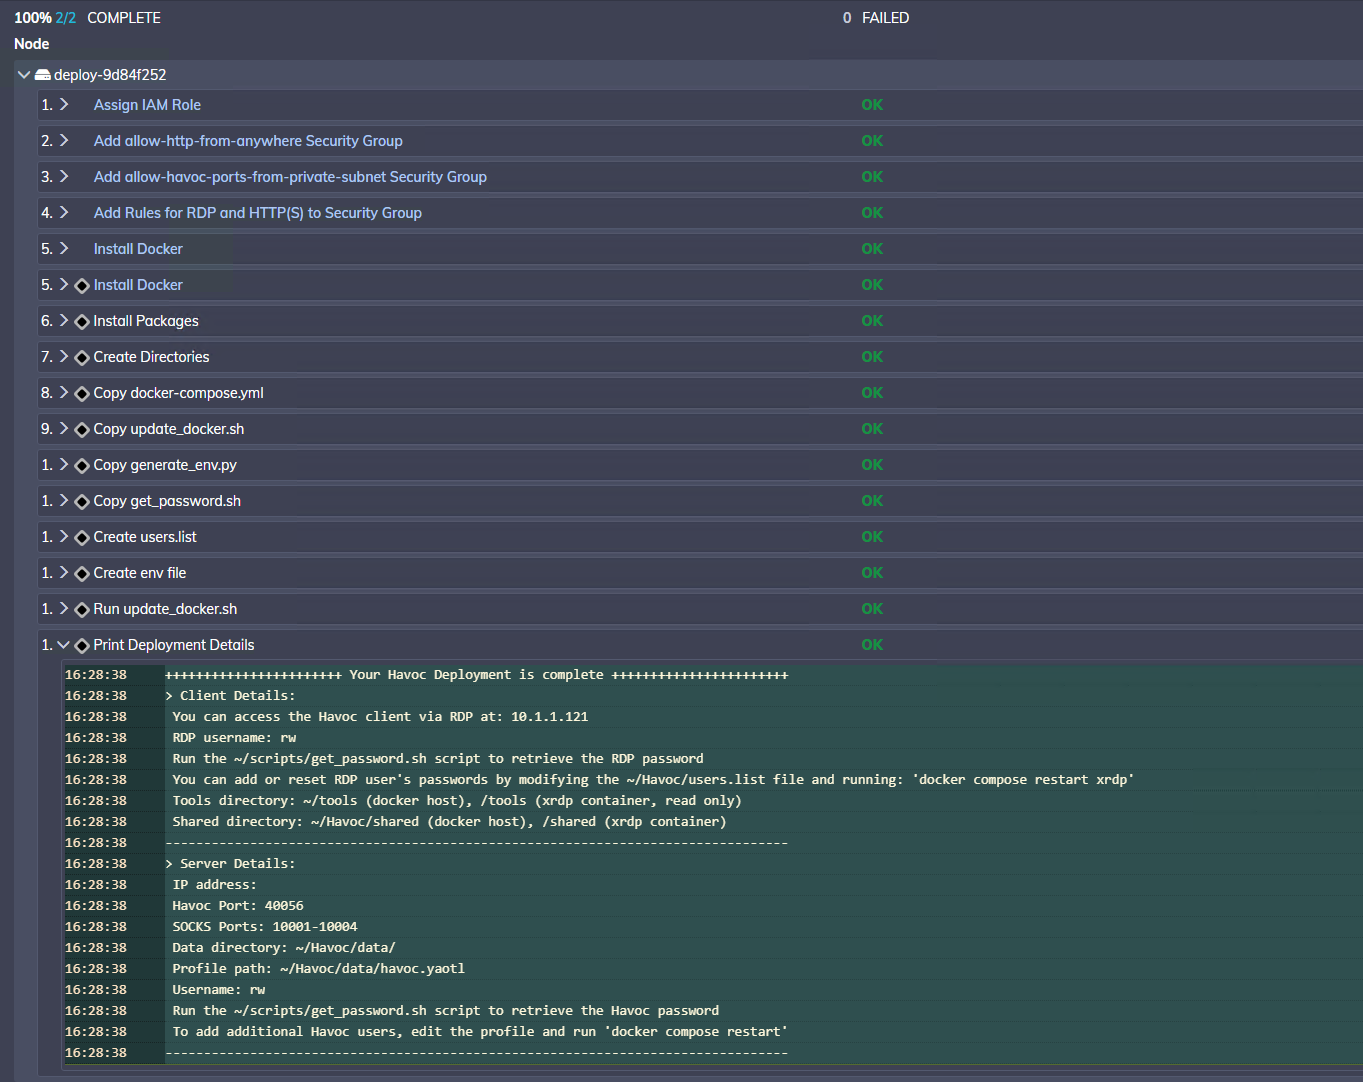
The job may take a few minutes to complete. Once finished, you can view the deployment details in the job output (click on deploy-xxxx -> Print Deployment Details):
Install Havoc C2 (with Local Redirector) Job
The Install Havoc C2 (with Local Redirector) job works relatively similar to the above job except that it carries out a few extra steps.
Namely:
- Adding DNS records in Route53 for the chosen subdomain/domain name to point to your instance's public IP
- Setting up Security Group rules to allow specific ranges (or the whole internet), to hit your instance's public IP
- Configure Traefik and Nginx containers to handle proxying and redirection of traffic
When running this job you will be prompted for the following inputs:
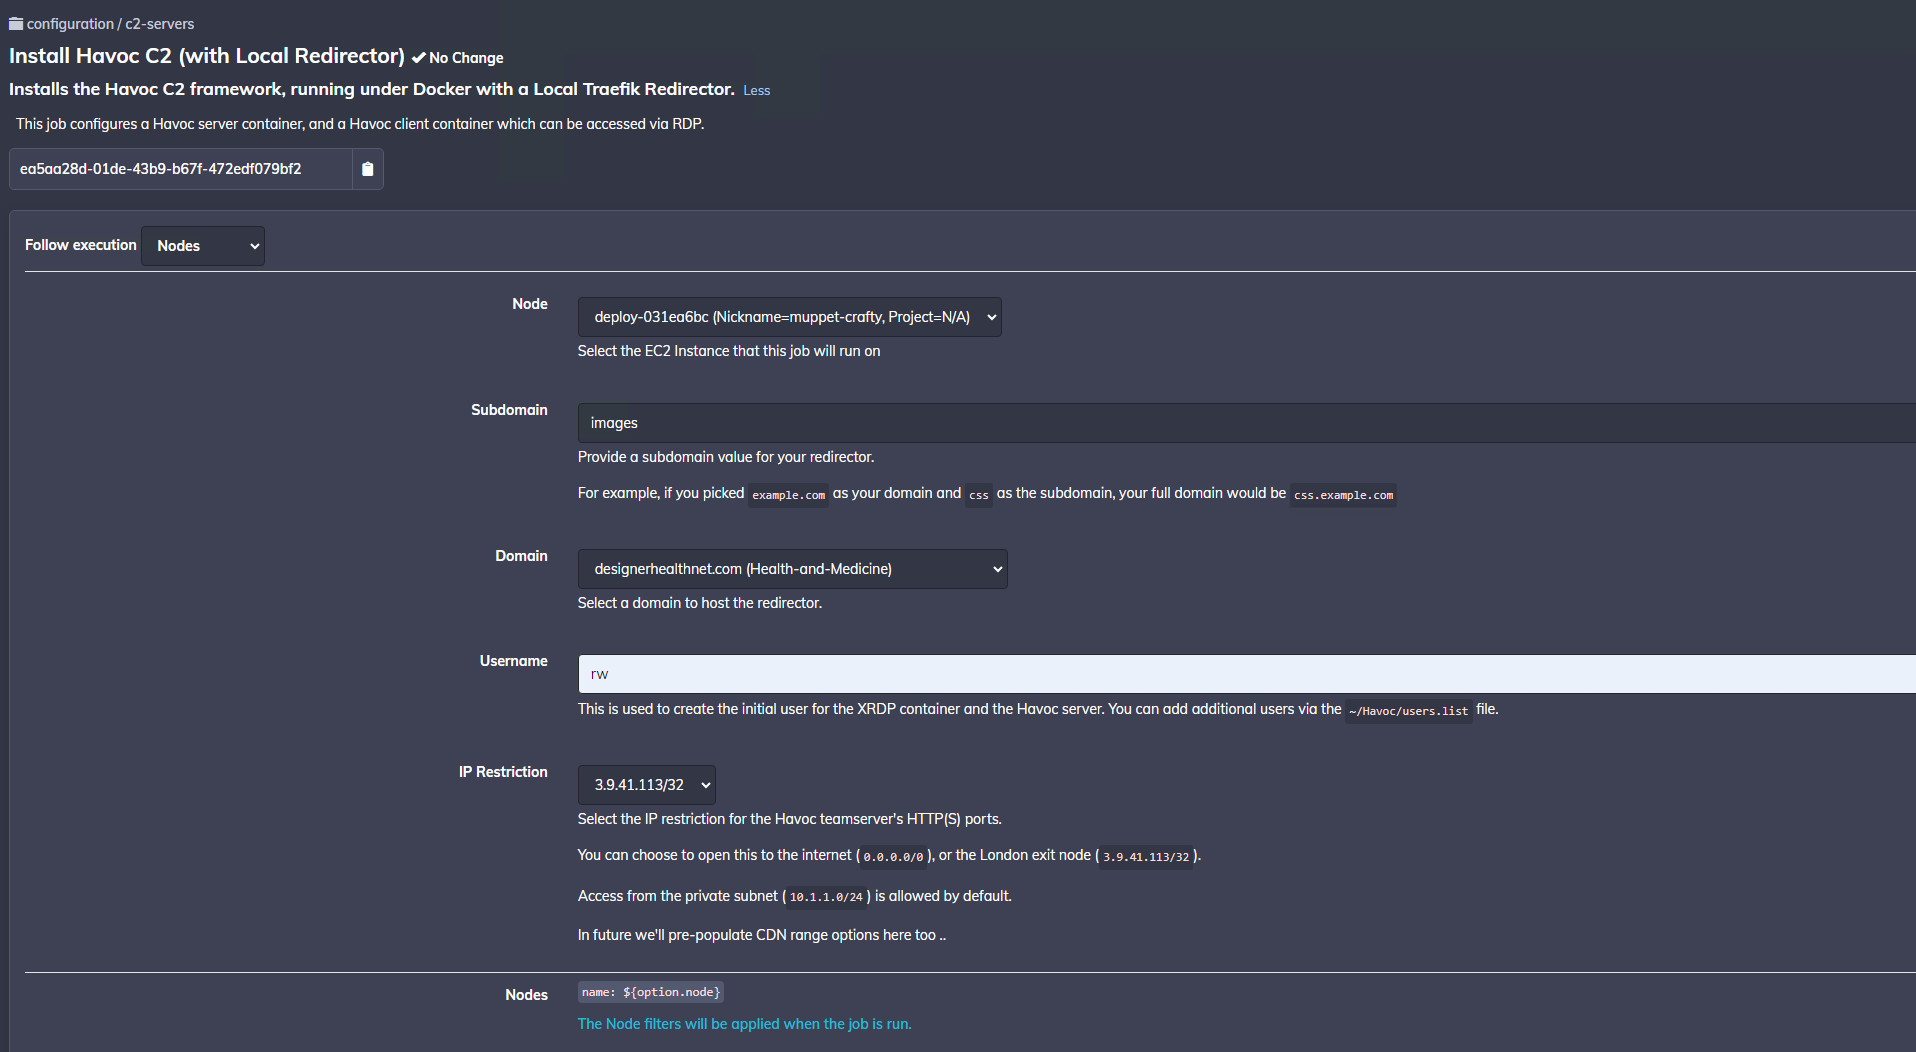
Choose a Subdomain and Domain value which will be used to host your redirector. Valid SSL certificates will be generated for this hostname using LetsEncrypt/Route53.
Note that the drop-down list shows the current categorisation for the domain. This is updated daily.
Select a username value which is used to configure the primary user for the XRDP container, and Havoc server. Passwords for this user will be generated randomly during the deployment, and can be retrieved from the host.
Select the appropriate Security Group rules using the drop-down form. Currently you can choose between allowing HTTP(S) access from only the London Tailscale exit (which is useful for testing when you don't want to expose the C2 server to the whole internet), or you can open it up to the whole internet on 0.0.0.0/0.
Note that if you want add additional rules later, you can do so using this job. However, there is currently no job to remove security group rules, so you may be best off starting with the more restrictive rule (London Tailscale Exit), and adding the 0.0.0.0/0 rule once you are ready to use your C2.
The plan in future is to make this option a multi-select option to allow you to add multiple Security Group rules. In future, we will add options for CDN ranges, enabling you to allow-list only CloudFlare IPs, for example. This will require another Rundeck job which runs daily to update a Security Group you can opt-in to.
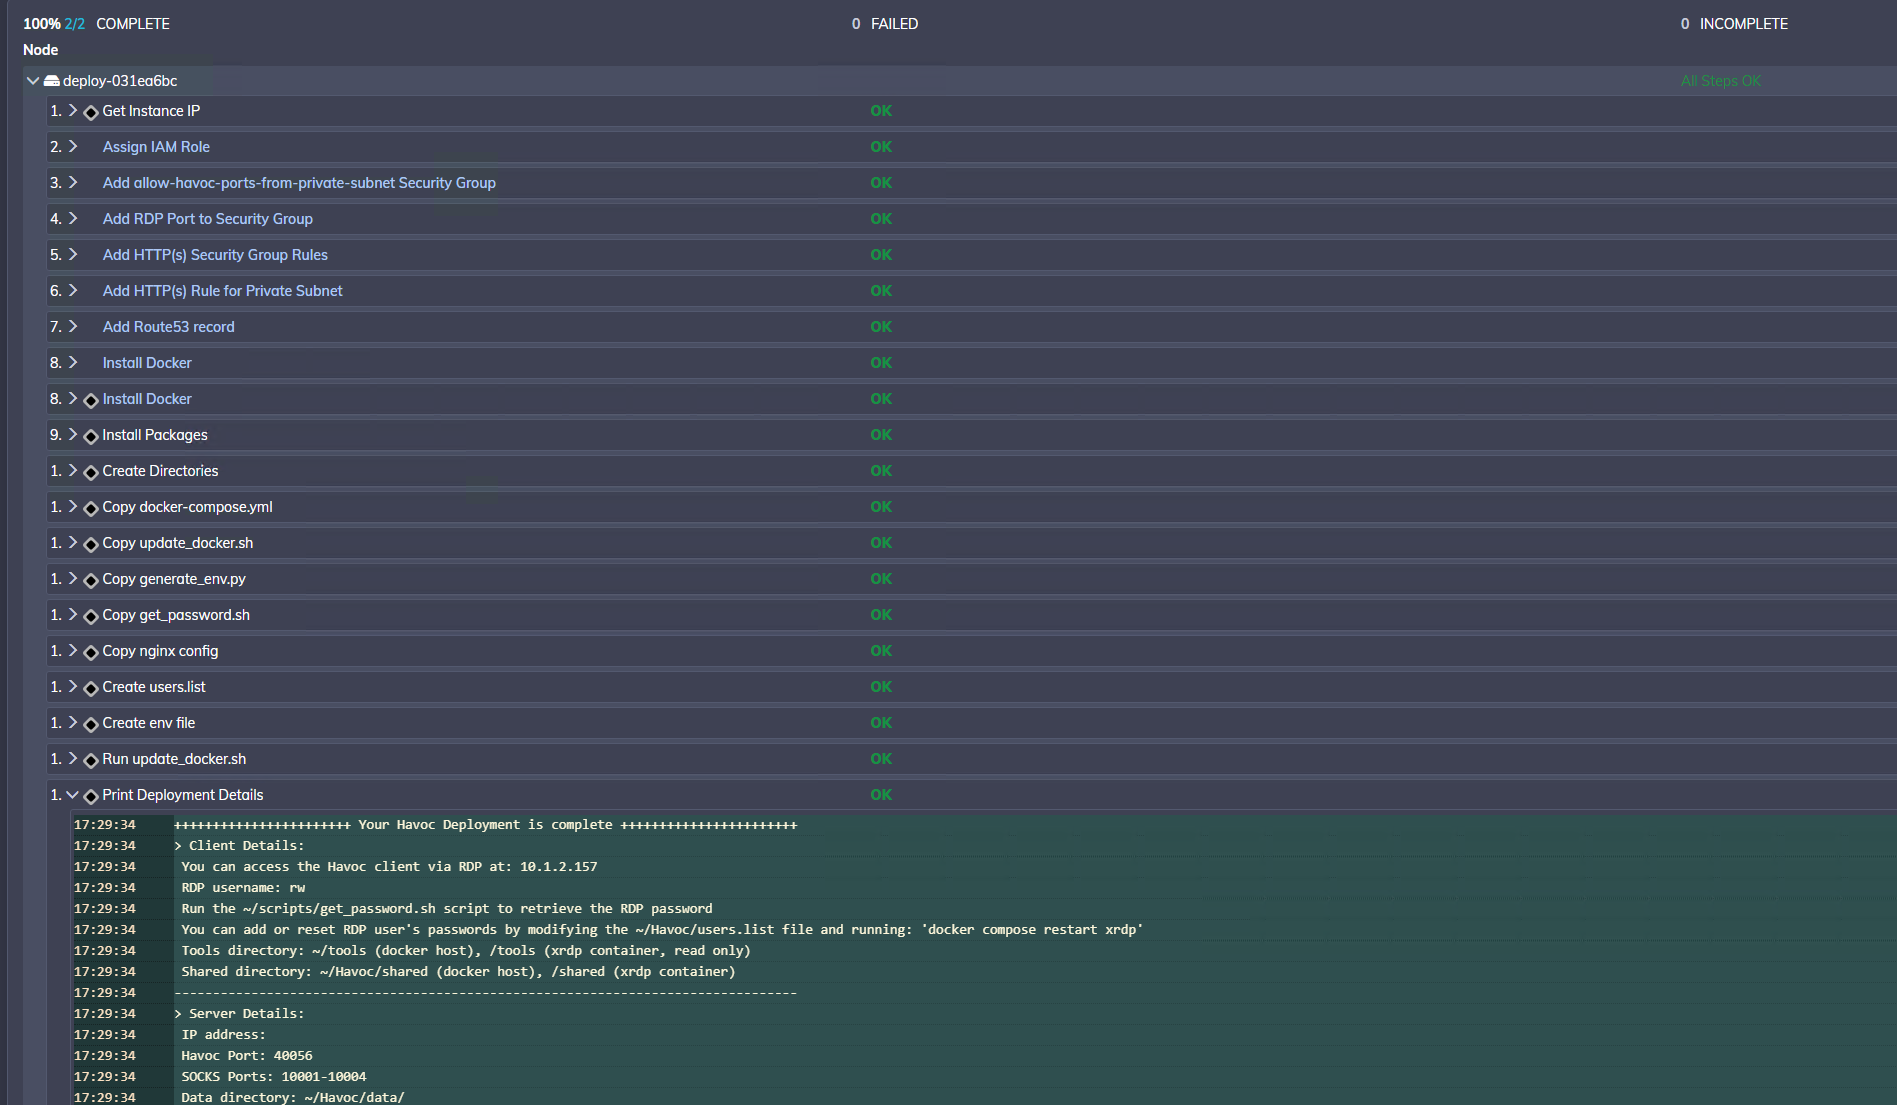
Hit "Run Job Now", and when the job is complete, you will be able to see the deployment details:
From here, accessing the XRDP container and host is the same as previsouly described. However, there are some differences in the host configuration, which are described below.
Accessing with SSH, we can see the following directory structure:
As shown above, there is a traefik directory which contains the dynamic.yml and traefik.yml files. These are the Traefik dynamic config files which are automatically generated whenever the havoc container is started. The traefik directory is mounted in both the havoc and proxy (Traefik) containers. This allows the Havoc container to write the config files, and Traefik to read the same config file(s).
If we look at the traefik/config/dynamic.yml config, we can see the generated rules:
Here we can see that:
- The
strip-headersmiddleware is configured to remove theX-Havocheader if present. This IOC is removed in the Havoc fork, but serves as an extra protection. - Two routers are defined. The
default-routeroutes any traffic which doesn't match the rules defined in theproxy-route. Requests to thedefault-routeare routed to thedefault-svc, whose URL is defined ashttp://nginx. This means that any non-C2 traffic is forwarded to the hostname of the Nginx container. - The
proxy-routecurrently contains a single rule which just checks if the host matchesimg2.sslvpn.uk. The reason for this simple rule is that the config generation script detected that there were no URLs defined in the Havoc profile, so it was only able to create a basic rule. If URLs and/or a User-Agent was defined in the Havoc profile, this rule would be more specific, allowing only the defined URLs/User-Agent values to be routed to theproxy-svc. - The
proxy-svcservice defines the URL for the upstream service we want to proxy to, which is the hostname for the Havoc server.
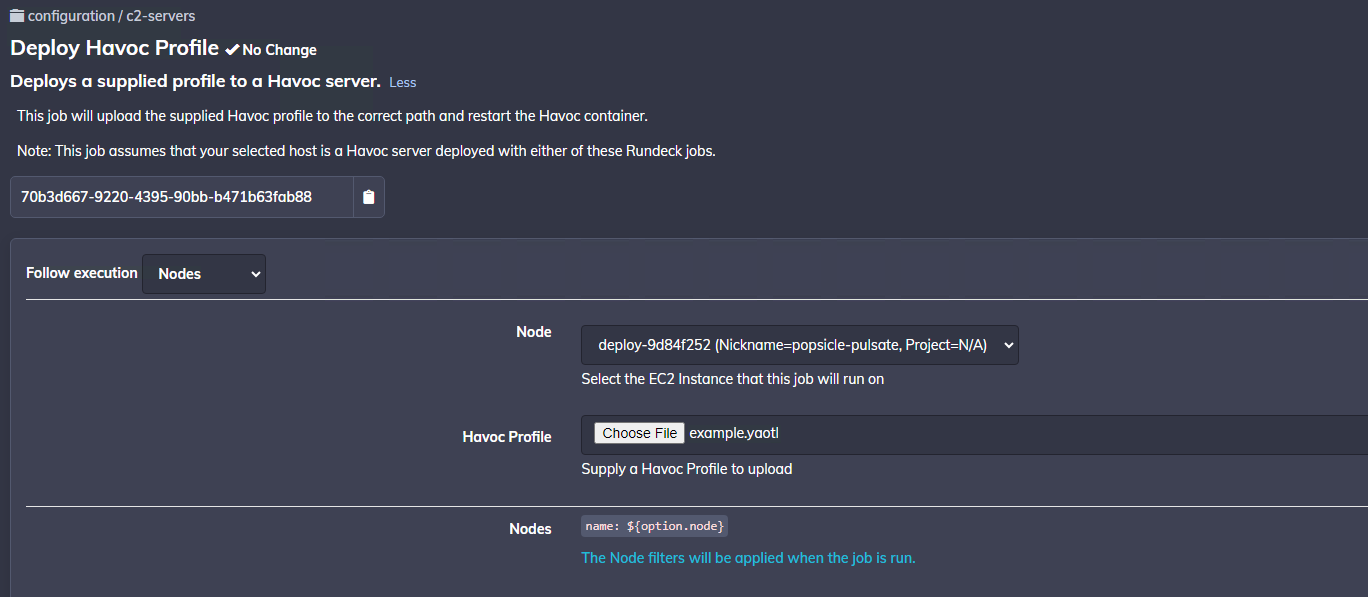
To demonstrate automatic rule generation, we can run the Deploy Havoc Profile job in Rundeck to upload a more complex Havoc profile, which contains listener URLs and defines a User-Agent value.
For this example, we'll upload a profile with the following Listeners block:
When the Rundeck job is complete, it will restart the docker containers, allowing the Havoc container to re-generate the Traefik rules. If we take a look at the traefik/config/dynamic.yml file again, we can see that it has now generated a more comprehensive rule:
This rule includes a check for the specific User-Agent specified in the uploaded Havoc profile, as well as a number of PathPrefix rules to match the defined callback URIs.
Note: If you modify the Havoc profile directly at
~/Havoc/data/havoc.yml, ensure you restart the containers with:docker compose restart --wait, in order to re-generate the Traefik rules.
If you want to modify the 404 page for nginx, you can do this by mounting the neccessary files and modifying the nginx/default.conf file on the host. Additionally, if you'd prefer to have non-matching requests forwarded elsewhere (e.g. a legitimate website), you can do this by modifying the .env file to change the TRAEFIK_DEFAULT_URL value. Remember to restart the containers afterwards.
Configuration
You can configure settings related to Havoc and the various containers, such as havoc-xrdp over SSH.
SSH onto the EC2 instance private IP (which you can find on the nodes page, or from your job output), using the username ubuntu, and your SSH private key.
Note that when you log in to the host via SSH, you will be shown a copy of the deployment details (this is configured via the ~/.bash_profile). This is to help remind you of the deployment details, and help with any useful tips.
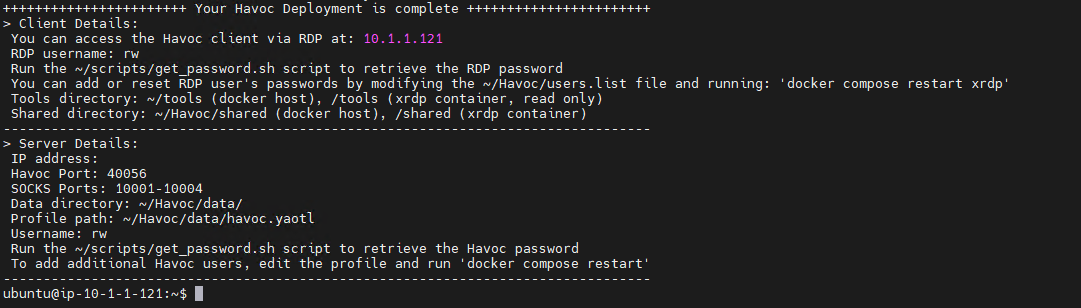
From here you can now RDP onto the host using it's IP address (on the Tailscale network). You can retrieve your password using the ~/scripts/get_password.sh script (see the following section for further details).
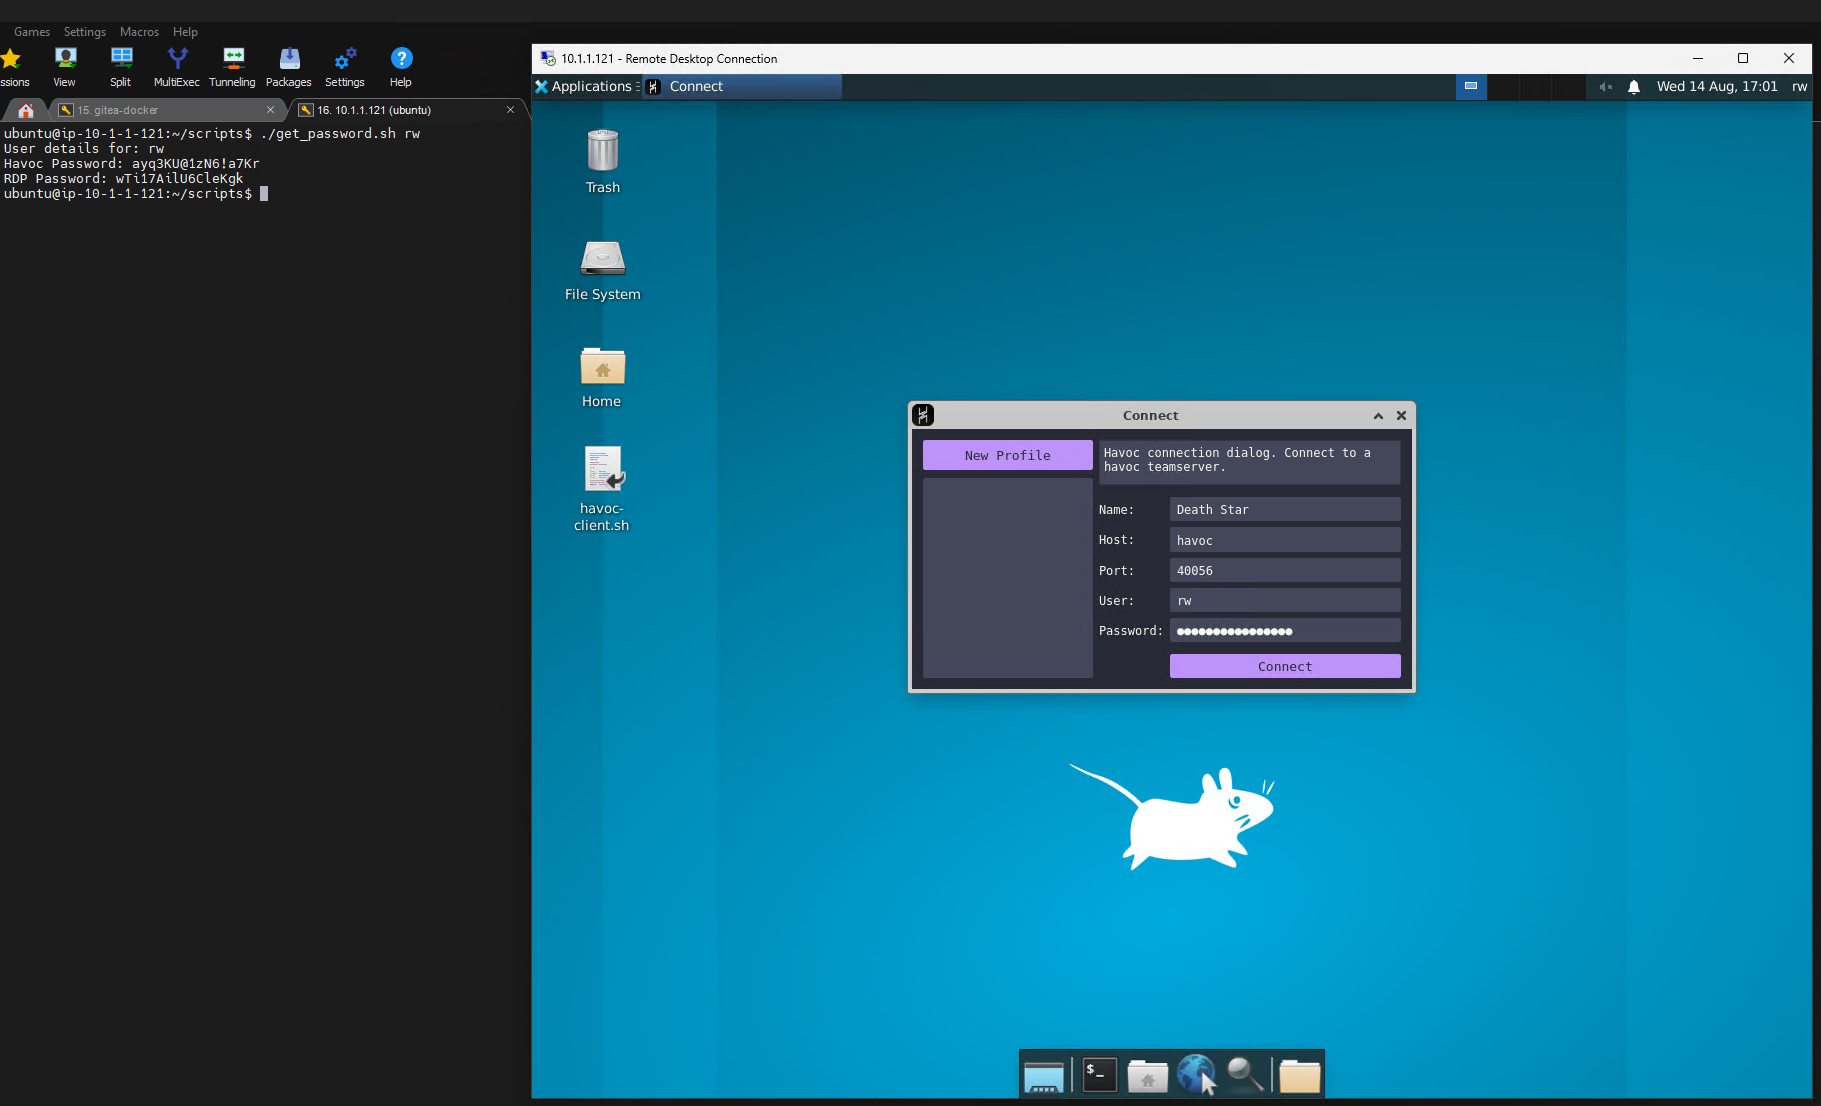
You can launch Havoc using the havoc-client.sh on the Desktop.
Once the client has started, click "New Profile", and this will fill out some default details for you. For the host value you can use the hostname of the Havoc server, which is simply havoc, and the Havoc password you retrieved above. Your username will be the username chosen in Rundeck. Leave the default port value and click Connect.
From here you will need to configure your listener. For a private deployment without any redirector, you will need to set the callback host to the private IP address of the host. Ensure you also set a host header.
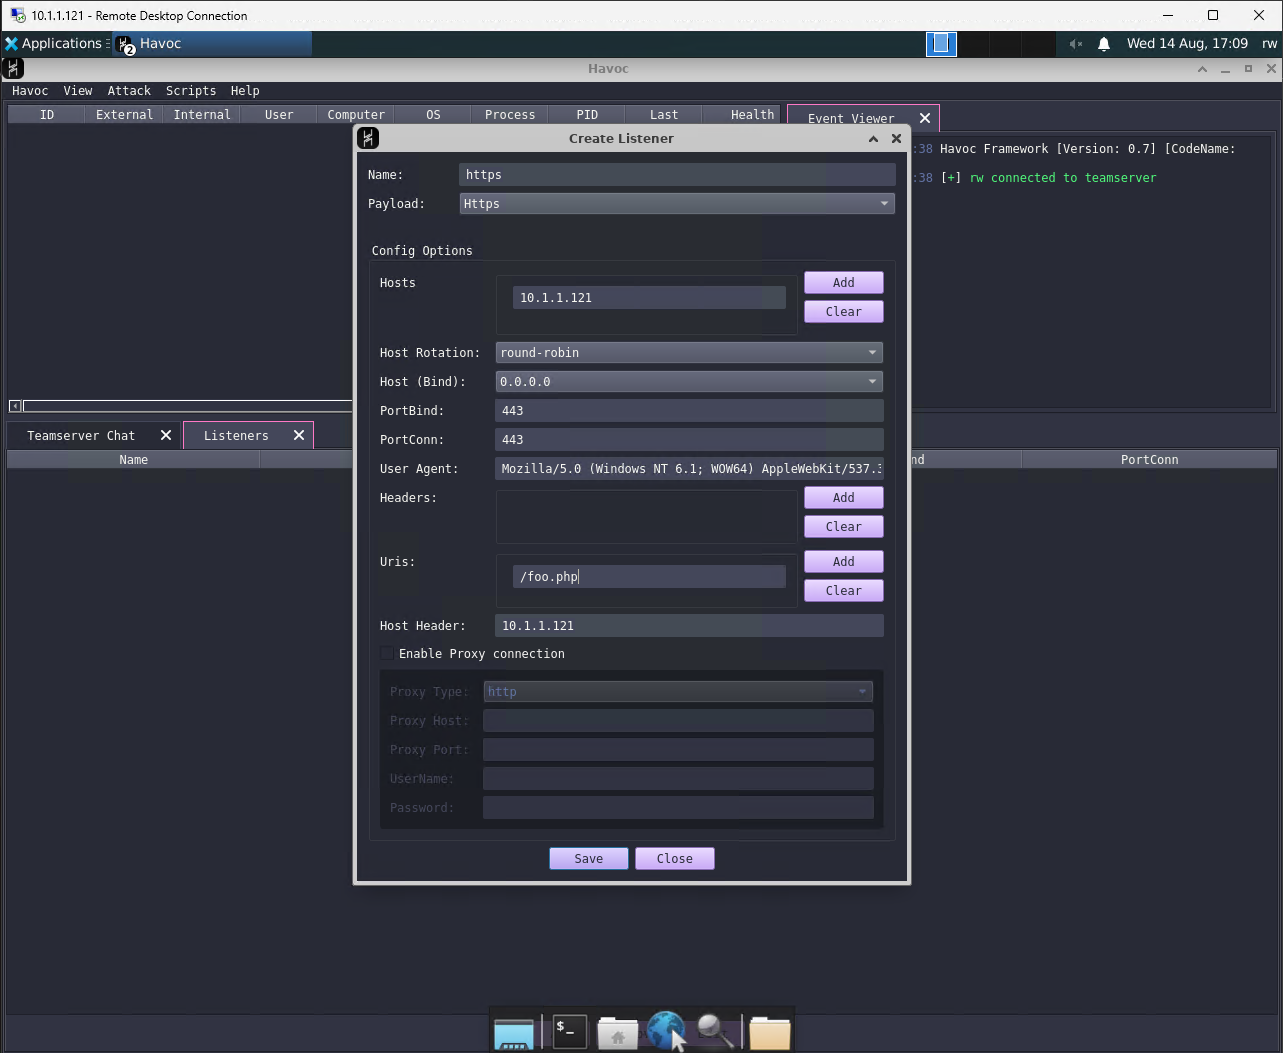
It's best to configure the listener in the Havoc profile file, rather than through the UI. This ensures that the listener is restarted properly on reboot, and ensures that there won't be any conflicts between the UI and the config. For local redirector deployments this also allows the Traefik config generator to pick up any changes (e.g. URI/User-Agent values).
There are a number of scripts which have been provided to help with administration/configuration of the containers. These can be found in the ~/scripts directory:
More details about these scripts can be found later in this document.
Havoc Data Files
The ~/Havoc/data directory is mounted in the Havoc container, allowing you to keep a copy of the teamserver.db and teamserver logs. This can be backed up, or processed by third-party tooling (Stepping Stones ingester when?).
Tools Directory
There is a tools directory on the host at ~/tools. This is mounted in the XRDP container at /tools. It is mounted as read-only within the container as this directory is meant to contain tooling and should not be used to share files from the container to the host.
The idea with this shared directory is that in future we will have additional automation which will populate the
toolsdirectory with pre-built post-exploitation tooling, which is output by our CI/CD pipeline. This would allow operators to have unique artifacts per deployment, and ensures that everyone is using the latest version of any tooling - which may include patches to remove IOCs as well as suitable obfuscation. Due to the shared nature of the XRDP client environment, it also ensures that all operators are using the same tooling. Updates to tooling can be automatically pulled/deployed as it just requires writing everyone to this single directory.
Shared Directory
There is a shared directory on the host at ~/Havoc/shared. This is volume mounted in the XRDP container at /shared. This directory is mounted with read/write permissions and is designed to allow sharing of files between the container and the Docker host. It can be used in situations where RDP sharing features (e.g. clipboard/drive redirection) cannot be used.
Files can then be uploaded/downloaded from the host via SSH.
Retrieving Passwords
You can retrieve the password(s) for XRDP and Havoc using the ~/scripts/get_password.sh script.
This script takes care of extracting the password for the specified user from the users.list file and the HAVOC_USERS_JSON variable.
You can run it like this:
Configuring Additional Users
You can configure additional XRDP users by adding them to the ~/Havoc/users.list file.
The format of this file is detailed previously in this document.
Note that after modifying this file you will need to restart the xrdp container with: docker compose restart xrdp
To add users to the Havoc profile, you can edit the ~/Havoc/data/havoc.yaotl file directly, or modify the HAVOC_USERS_JSON variable in the ~/.env file.
Note that if you change the .env file you will need to make sure the HAVOC_USERS_JSON variable is formatted appropriately. It is therefore encouraged to edit the Havoc profile instead.
After changing the .env or havoc.yaotl files, you will need to restart the Havoc container with: docker compose restart havoc.
Updating the Havoc Profile
You can update the Havoc profile by editing/replacing the ~/Havoc/data/havoc.yaotl file. Remember to restart both the Traefik and Havoc containers if you are running a redirector deployment.
You can do this using: docker compose restart --wait.
Note that there is also a Deploy Havoc Profile Rundeck Job, which you can use to upload a Havoc profile to your instance. This automates the uploading of the profile and restarting of the containers, ensuring that the permissions are configured correctly.
Updating the Docker Images
Since the Docker images are hosted on the internal Gitea repo, we have a mechanism for making these available to instances running in the cloud.
This is achieved by exporting the images during the build and uploading them to the aw-store S3 bucket. This is significantly cheaper than using Elastic Container Registry (and VPC Endpoints), and means that the instances can pull down the container images without providing credentials (via the magic of IAM profiles).
In order to reduce the storage cost for these containers, the images are also compressed using gzip.
Therefore, to deploy and update the container images from an EC2 instance, we need to:
- Copy the latest images from the
aw-storeS3 repo - Decompress these images using gzip
- Load them into Docker using
docker load
This process is a bit fiddly and can be time consuming, so some automation and optimisation is carried out using the ~/scripts/update_docker.sh script.
This script carries out the following steps:
- Pulls the latest images from the
aw-storeS3 repo using the host's IAM profile credentials and theaws s3 cpcommand - Checks the manifest hash of the image and compares it with the output of
docker image inspect, to see if the image is newer than the current one - If the image is newer,
docker loadis used to load/update the docker image locally - Runs
docker compose up -dto restart the container(s) with the new image(s)
This makes updating the container images much quicker, and allows us to reduce costs without compromising security.
When initially deploying Havoc on the host, the update_docker.sh script is used to load the Docker images. However, if you want to update these at any point (for example, if new patches become available in the fork), then you can simply run the script via SSH.
Detections
Any detections that we are aware of for Havoc. If possible include a screenshot or description of the rule (if known).
Elastic Security
NOTE: the details in this section relate to the public Havoc project. If you are using the internal Havoc container images, then the patches are applied already for you. If you are building Havoc from the fork repo then you will need to run the patcher script. In the Havoc fork this can be achieved using the
make allcommand, which calls the patcher script and applies the patches in the correct order. The information is kept here to describe the process for triaging and bypassing detections for some common EDR/AVs.
Elastic Security detects Havoc in memory, and has a number of Yara rules for which can be found in the protections-artifacts repo.
In addition to these specific detections, Elastic can detect stack-spoofing and various shellcode injection techniques generically. Typically these behaviours will trigger a memory scan, which can be used to identify Havoc specifically.
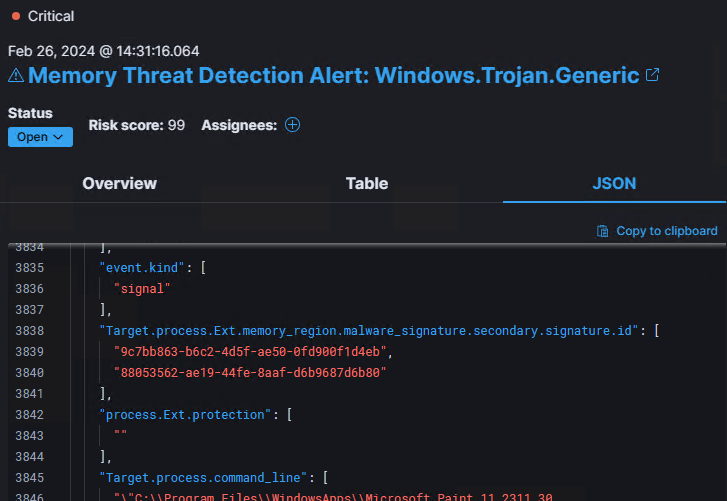
Testing Havoc on a Windows 11 23H2 host with Elastic Endpoint installed, we can see the following in-memory alerts triggered:
These GUID values are the id value from the protections-artifacts Yara rules, which we can lookup and find the exact pattern they are looking for.
So if we look at the Windows_Trojan_havoc.yar file, we should find two rules, Windows_Trojan_Havoc_9c7bb863 and Windows_Trojan_Havoc_88053562 - which contain the detection logic and byte patterns they are searching for.
The first one (Windows_Trojan_Havoc_9c7bb863), we can see the following two byte-patterns:
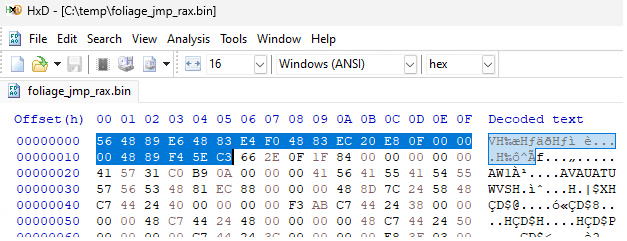
If we check the shellcode generated in Havoc, we can see that this byte pattern is at the beginning of the shellcode file:
We also find the $a2 values at offset 0x000002f0.
Next we take a look at the logic of the Yara rule:
This simply says that in order to be a valid detection, then Yara must find both byte patterns within memory. That means, if we can just patch one byte in either of the patterns, we can bypass this rule easily.
It's a similar case for the Windows_Trojan_Havoc_88053562 rule:
In this case, there's just the one big byte pattern. If we can patch this byte pattern, either directly as a byte-patch, or by modifying the source before compilation - then it should be easy to bypass this rule.
So, what do these byte patterns actually represent? Let's look at this one:
Since this is at the very beginning of the shellcode file, and the shellcode is pretty small, we can just dissassemble this with CyberChef, or with Defuse.ca, if you prefer.
This produces the following instructions:
This code saves the value of rsi onto the stack and moves the current stack pointer in rsp into rsi, and aligns the stack to a 16-byte boundary. This is typical of a entrypoint function. It then subtracts 0x20 from rsp (allocating 32 bytes of space on the stack), and then does relative call 0x20. A relative call takes the offset from the address of the next instruction, which is at 0x11. So we can calculate this as 0x20 + 0x11 = 0x31 (the address of the next mov, plus 0x20).
If we dissassemble the code at 0x31, we can see that this looks like the start of a function:
Ok so now we checked the hard way, we can actually confirm this is the case by looking at the shellcode loader in the Havoc project source code:
We can see the source code for Entry here.
~~I'm currently not sure why the Start function allocates the 0x20 stack space, since Entry clearly allocates its own stack space (0x88 bytes). This will either be for alignment, or the extra 0x20 bytes might actually be used somewhere else. I need to check, but basically if its not used then you could just change this to an arbitrary value. Otherwise just patching in some extra nop (or nop like instructions) in Start would also probably work fine.~~
As we can see in the above code, the Start function allocates the 0x20 stack space, but Entry clearly allocates its own stack space (0x88 bytes). Therefore a very simple patch seems to be just to change the sub rsp, 0x20 instruction to sub rsp, 0x30 instead (i.e. a one byte patch!).
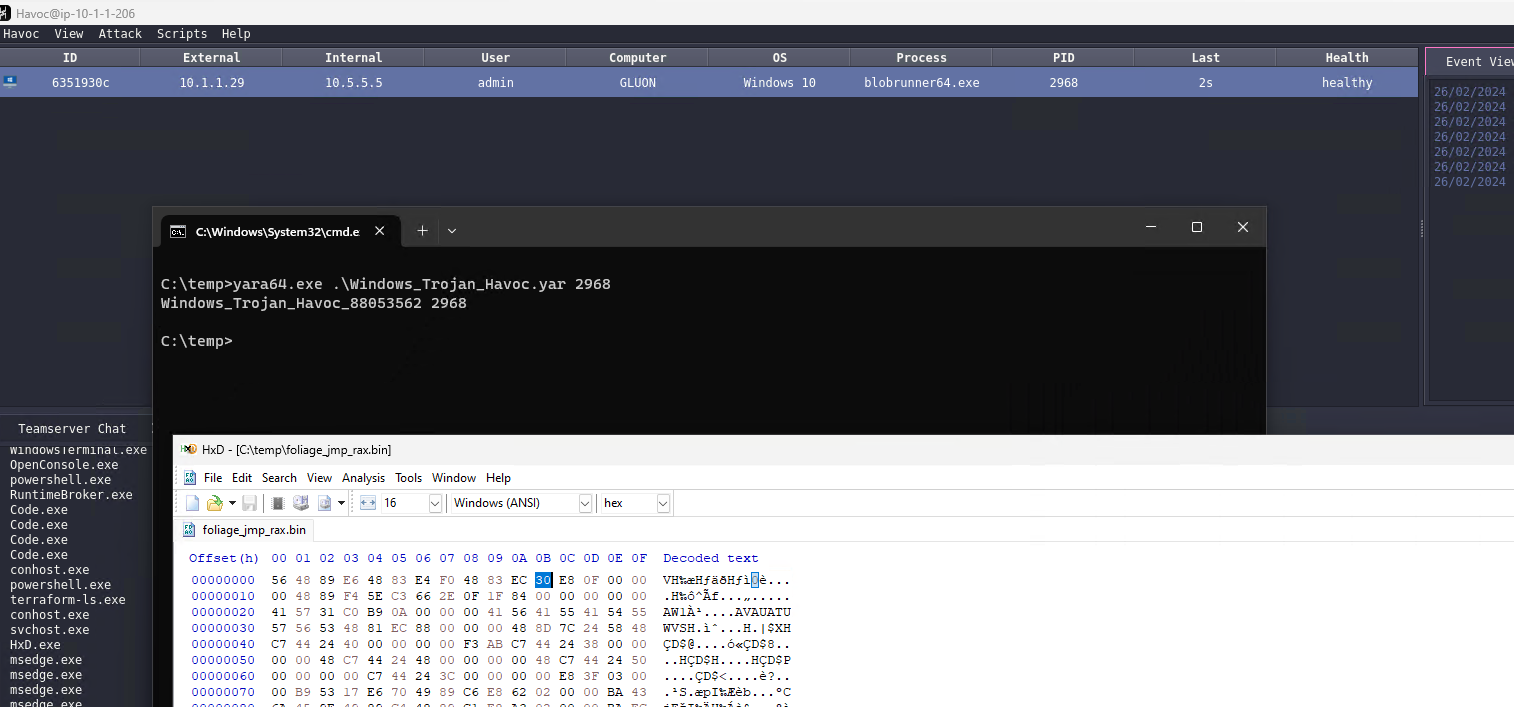
If we patch this one byte in a hex editor, we confirm that we still get a beacon, and the Windows_Trojan_Havoc_9c7bb863 Yara rule is no longer triggered (note that Windows_Trojan_Havoc_88053562 is still found):
Now let's take a look at Windows_Trojan_Havoc_88053562..
First we need to dissassemble the signature:
Unfortunately this isn't quite as easy as the first, and is likely to be in some compiled code rather than the asm loader. Let's try and generate a .exe and see if the pattern is present in that, since it will be easier to navigate in Ghidra/IDA.
Sweet, yeah its also in the demon executable. Which makes sense since the shellcode loader is just bootstrapping demon into memory and calling DemonMain. Let's load up demon into Ghidra.
Weirdly, searching for this byte pattern in Ghidra finds some code outside of any function.
We can force Ghidra to dissassemble this using the d hotkey, which produces some output. It's not clear from this output what the function actually is though:
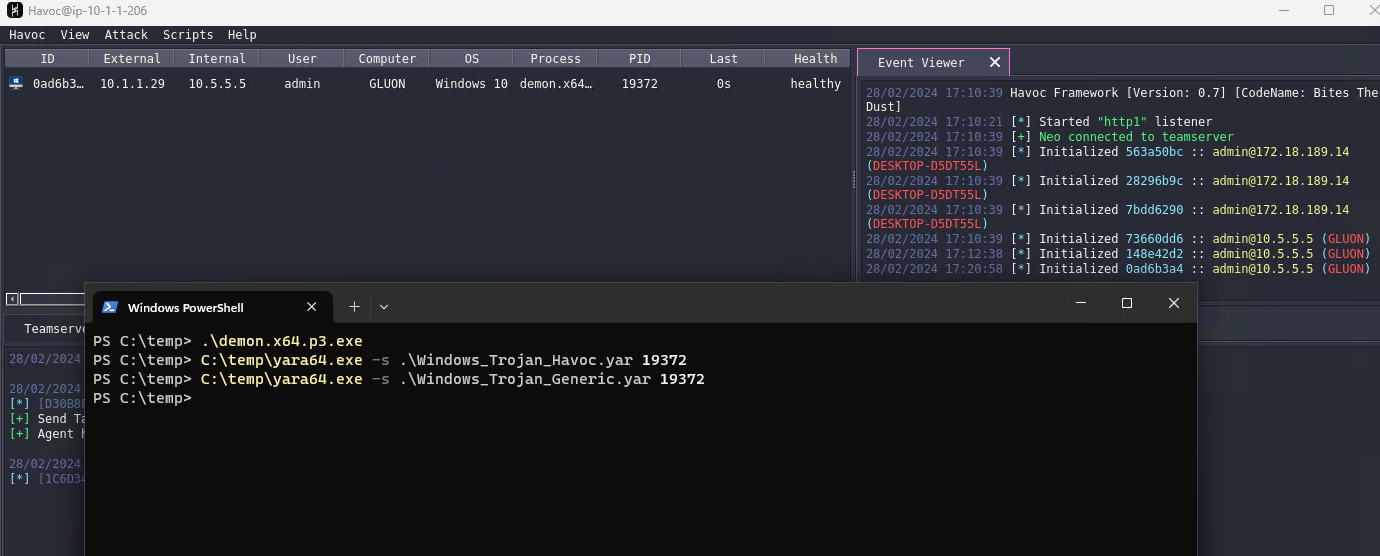
To help find out what this function is, we can tell Havoc to compile artifacts in debug mode, which will give us debug symbols in the Demon executable. To do this, run the Team Server with:
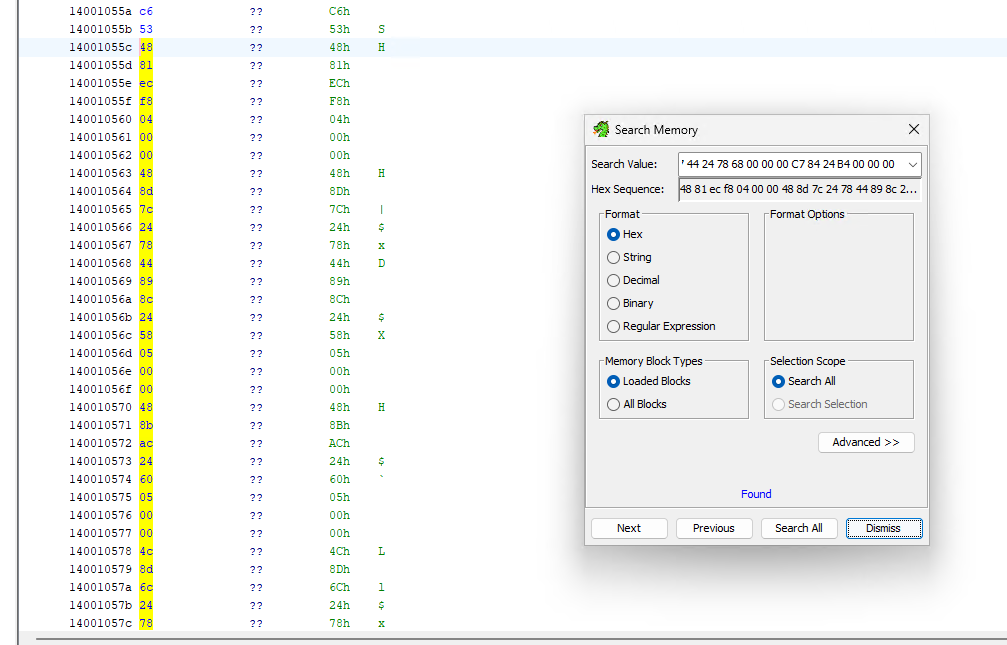
Now if we re-generate our Demon executable artifact, and load it into Ghidra we should be able to search for the pattern again. Note that because we're now in debug mode, the byte pattern might not be exactly the same anymore, as optimisation may be skipped, and debug-only behaviour that was previously ifdef'd might now appear. To get round this, we can try searching for part of the pattern. For example, searching for 00 00 00 C7 84 24 B4 00 00 00 gives us only two results:
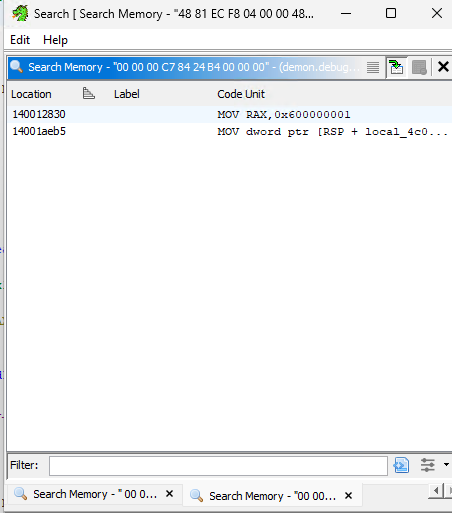
Looks like we got lucky on the second hit and we can see that the code and function signature matches what we were seeing before. So it looks like our mystery function is ProcessCreate:
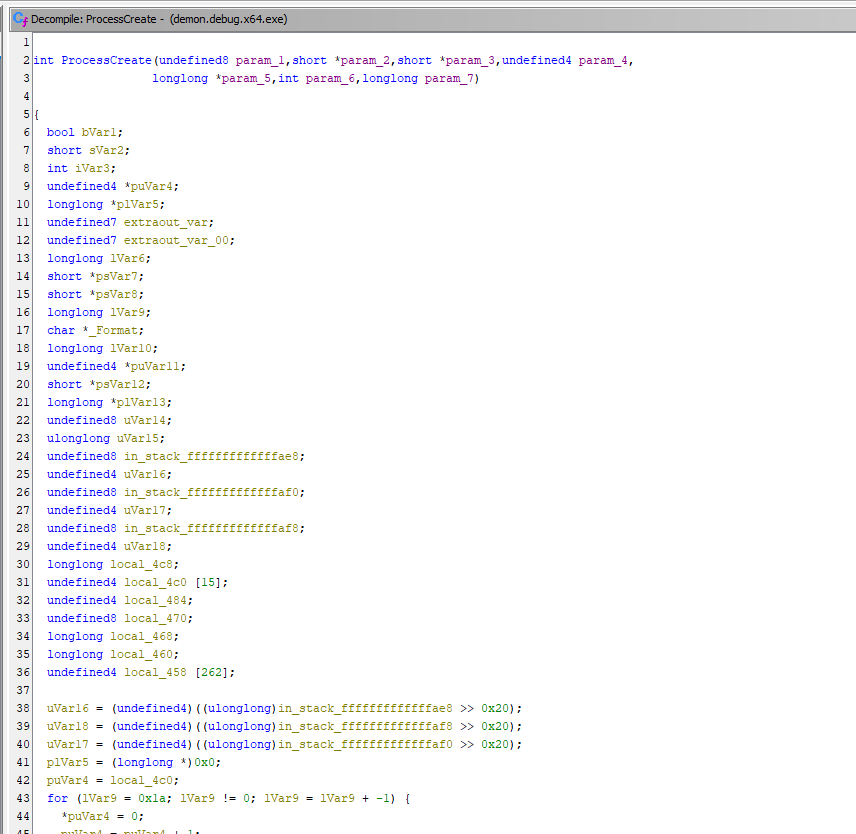
Now we can actually go and check the source code for Havoc's ProcessCreate function. Much easier to read.
Side-note.. This wasn't the first thing I tried. I'd stared at the assembly for ages before resorting to this ridiculous regex to try and find all functions in the source code that took 7 arguments. Unfortunately I was foiled because of the
INandOUTattributes, doh! Lesson learned. When you have the opportunity to use debug symbols, use them! (or learn how to do regex properly) :D
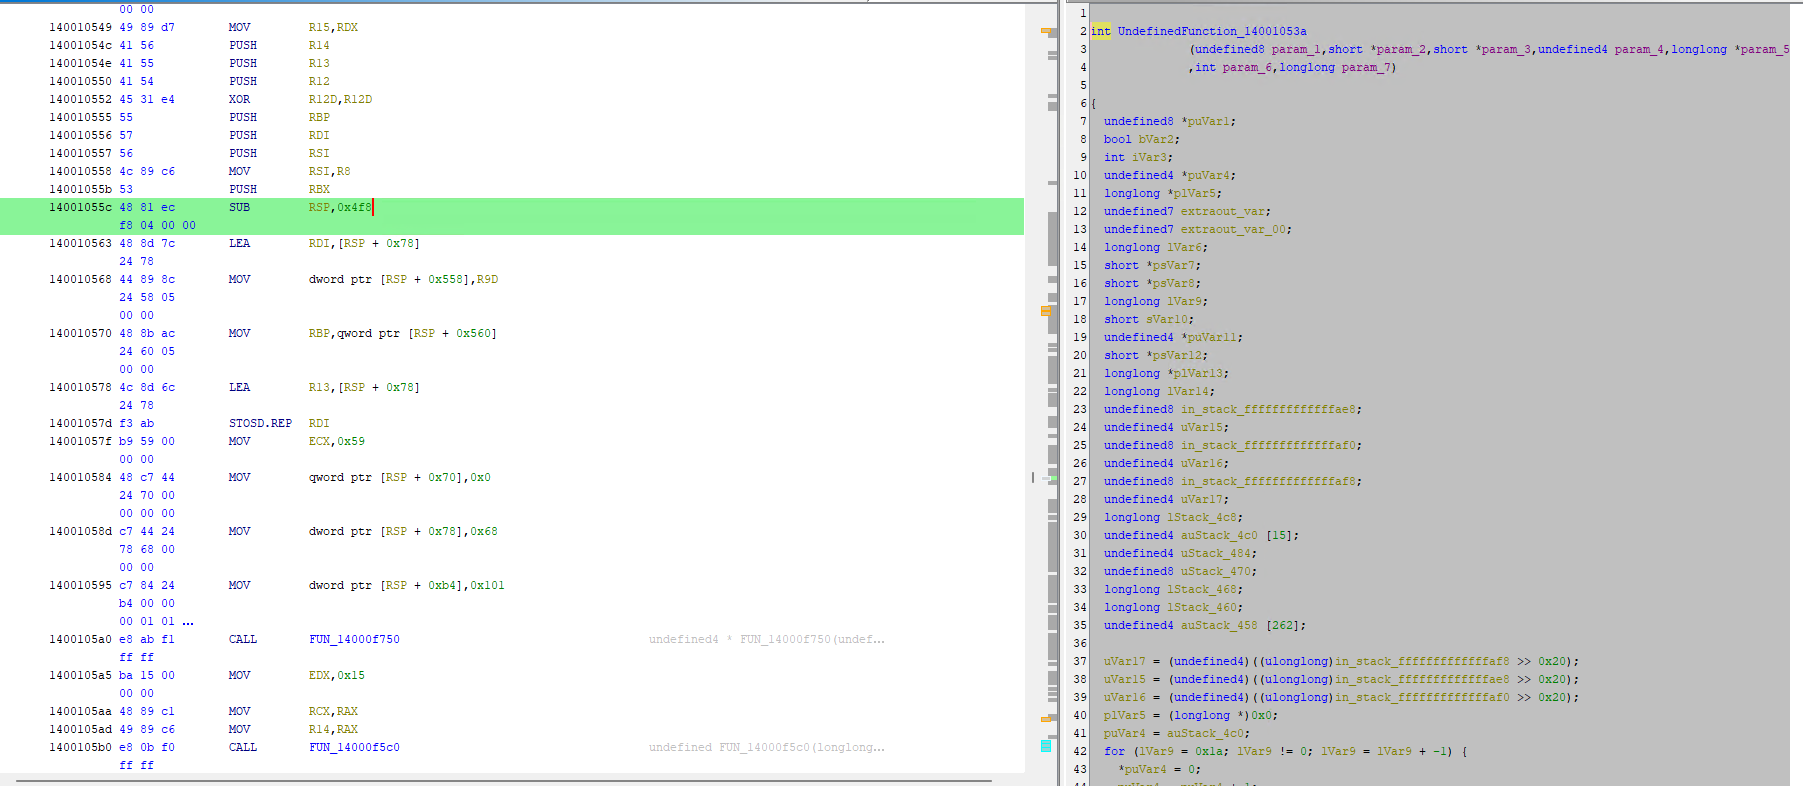
Now we know what/where the code is. Let's look again at the original assembly, and compare it with the debug version.
The original (non-debug build):
The debug version is slightly different (as explained earlier), however it has generally the same structure:
and in the source code:
So how can we patch this signature? Actually, this should be pretty easy. Since we have the source-code, no binary patches are required! As you will have noticed above both the signature bytes and the function assembly-bytes (in both debug and prod builds), all start with 48 81 ec f8 04 00 00, which is sub rsp, 0x4f8. This is actually the last part of a standard x64 function prolog, where the function is allocating 0x4f8 bytes of stack space for it's local variables. At the end of the function we will see the following, which shows the epilog, where it adjusts the stack back by the same amount:
Therefore, a simple byte-patch (if we didn't have the source), would be to first patch the sub rsp, 0x4f8 to another value, say sub rsp, 0x508 (16-bytes larger). Then, since we allocated extra stack space, we also need to adjust the prolog bytes to add rsp, 0x508. This will break the Elastic signature, whilst maintaining the original functionality.
However, since we do have the source code - we could just add an extra local variable to the source code, which will have the equivalent effect of changing the stack size. Note that to avoid the compiler optimising away any unused local variables we add, we can mark them with the volatile keyword.
So, for example, in the payloads/Demon/src/core/Win32.c source file we could do something like this (added code is commented):
Now, if we re-generate our Demon executable artifact, and load it into Ghidra, we can see that the stack now uses 0x508 bytes, and the signature is gone:
This effectively does what we described in manual patching, but is much more user-friendly, and gives us more control over the resulting assembly :)
So, tying it all together, to bypass the Elastic signatures we need to:
- Modify the
payloads/Shellcode/Source/Asm/x64/Asm.sfile to change thesub rsp, 020hto another value, e.g.sub rsp, 030h. - Modify the
payloads/Demon/src/core/Win32.cfile to add somevolatilelocal variables.
The following git patch can be used (havoc-elastic.patch):
Which can be applied with:
Note: you can skip the
git cloneif you already have a deployment, as long as the.gitdirectory is still present. Justcdinto the folder containing the Havoc repo and apply the patch withgit apply
You will also need to recompile the shellcode templates. To do this run:
You should see some output like:
You can confirm the shellcode compiled correctly by running: xxd ../Shellcode.x64.bin |head -n 1. It should look like this:
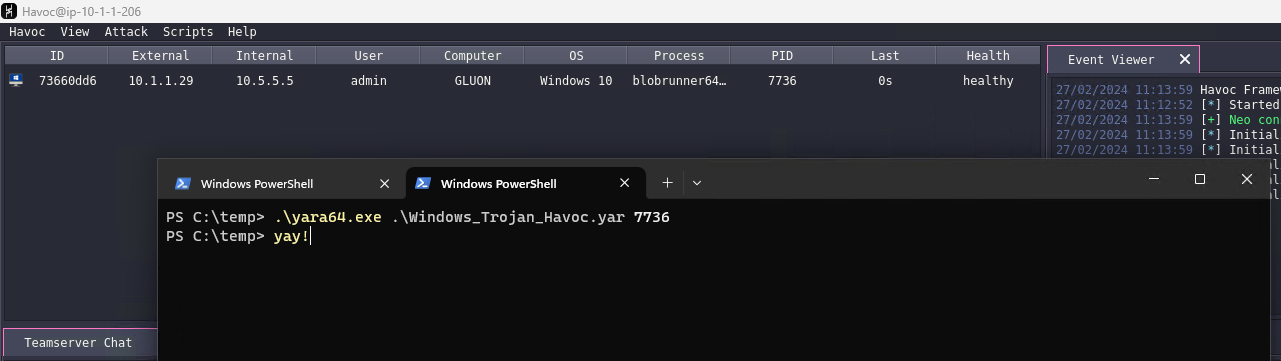
Now we can run a final test with Yara, with the re-generated artifacts, and the server in non-debug mode:
Note: there is another rule,
Windows_Trojan_Havoc_77f3d40e, which I've not managed to trigger. It could be that it doesn't detect the latest version of Havoc. However this rule is fairly brittle and looks for some hardcoded API hashes (for example88 2B 49 8EisRtlExitUserThread). We could bypass this by changing the hashing functions (currently djb2) if needed, and is probably a good idea in general.
Elastic Security (Continued) - Generic Detections
As mentioned at the beginning of the previous section, there are some "generic" detections which, whilst not specific to Havoc, do result in a Memory Threat Detection Alert when running Havoc on a machine with Elastic Endpoint installed.
Firing out patched Havoc Demon shellcode on our Elastic machine now produces a single detection alert:
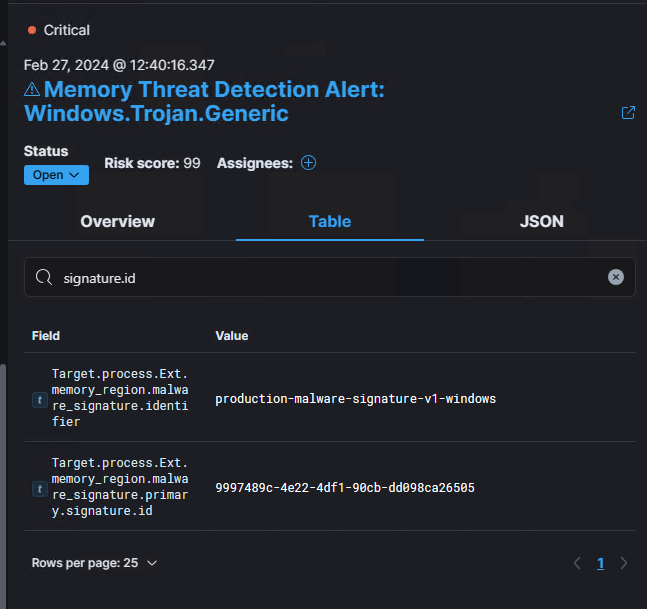
Searching for signature.id, shows that it's triggered an alert for the 9997489c-4e22-4df1-90cb-dd098ca26505 rule ID, which we can find in the protections-artifacts repo, and relates to the Windows_Trojan_Generic_9997489c rule.
The byte patterns and logic for this rule are:
This rule appears to be looking for common API hashes, and will generate an alert if it finds 4 matches.
The most common API hashing routine in malware is djb2. This is because it is a fast, portable string hashing routine which can be easily implemented in PIC shellcode. Havoc uses the djb2 algorithm for hashing/resolving functions and modules in it's loader via the KHashString function, which uses the constant HASH_KEY value of 5381 (the default for djb2). The only difference being that it will uppercase the string before hashing:
As mentioned, the loader uses these functions to lookup modules and functions at runtime (via KGetModuleByHash and KGetProcAddressByHash). One example from the Havoc loader code is shown below:
Here, the loader is calling KGetProcAddressByHash with the hash value from constant SYS_LDRLOADDLL (defined in Core.h), whose value is 0x9e456a43.
So if we want to modify the hashing routine to use something other than djb2 (or mangle the hash somehow), we'll need to change the value of these constants to the new hash values.
The Yara rule itself gives a clue as to what API hashes it's looking for, but let's generate them to make sure. To do that we'll write a small C++ program which generates the djb2 hash for the API functions named in the Yara rule.
These will be defined in the Yara rule in little-endian format, however in the Havoc code they are defined in big-endian. Therefore we'll also need to swap the endianness. In visual studio you can use the
_byteswap_ulongintrinsic, or in Python you can use.to_bytes(4, byteorder='little')
Running this gives us the expected hashes (they match the Yara rule bytes):
So how can we change this to avoid these signatures? We could write our own hashing algorithm, but we'd need to make sure that firstly it doesn't cause too many collisions, and secondly that its both fast and portable (in the PIC sense).
Another option is to simply pick another well-known algorithm, but this does run the risk of security vendors writing signatures (if it is popular enough in malware).
The final option would be to somehow mangle the output of djb2 so that it's still the same algorithm underneath, but the value is slightly changed. This runs the risk of the first option, since mangling the output is essentially just extending the algorithm and likely to introduce less collision-resistance.
Let's go with option 2, and use the sdbm hash. Modifying our C++ program to print both djb2 and sdbm:
Which produces the output:
Looking up these hashes on Google/GitHub there are a lot less results, but still not unknown. It is good enough for avoiding the Elastic rule though. However, taking into account that the original code uppercases the string, the resulting hashes produce no results on Google/GitHub (for example LdrLoadDll: sdbm big=0x24a64f1d, little=0x1d4fa624 🔍🤠
So to patch this into Havoc, we need to:
- Replace the
KHashStringfunction to usesdbm -
Replace the constant values in the following header files with the new hash values:
-
client/Modules/InvokeAssembly/include/KaynLdr.h client/Modules/Template/include/KaynLdr.hclient/Modules/PowerPick/include/KaynLdr.hpayloads/Shellcode/Include/Core.hpayloads/Demon/include/common/Defines.h
Since there's quite a lot of places that the hashes need to be updated, I ended up writing a script which automates the process of re-hashing and replacing the API hashes.
This is part of our internal Havoc fork.
The forked version is already patched, however if you wanted to patch the hashes from the main repo, you could run the following:
You should see some output like this:
Now if we compile Havoc and re-generate our artifacts we can test if the detection is removed 🎉
Note: after doing this, I found this blog from ZScaler ThreatLabz which also describes a detection for Havoc based on API hashes.
Microsoft Defender
Scanning the default artifact from Havoc with Microsoft Defender produces a detection with the signature Trojan:Win64/Havokiz.DX!MTB.
We have an internal tool called re-offender that can parse the Defender signature database (.vdm files), to dump specific Threats.
In the VDM format, the value that is often referred to as the signature name (
Trojan:Win64/Havokiz.DX!MTBhere), is actually a container called a "Threat", which can be made up of multiple signatures.
Using this tool to dump the signatures for the Trojan:Win64/Havokiz.DX!MTB Threat, we can see the following:
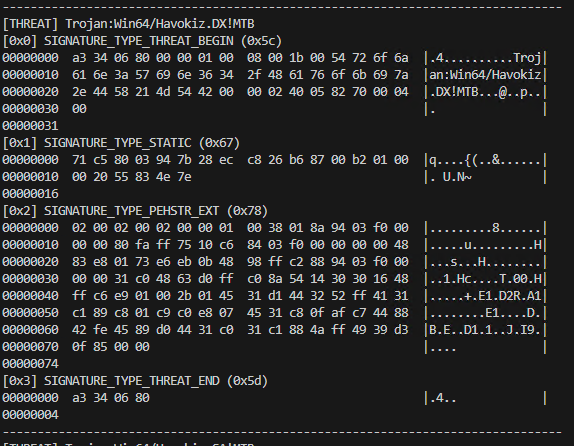
This means that there are two signature types contained in this Threat. The first one is SIGNATURE_TYPE_STATIC and the second one is SIGNATURE_TYPE_PEHSTR_EXT. Currently the tool can only parse the SIGNATURE_TYPE_PEHSTR_EXT type so we'll concentrate on that.
This signature type has a relatively simple format which contains a header and one or more byte patterns, which it uses to match against file content. This is very similar to how Yara works, and in fact, we can convert this format into Yara. The re-offender tool does this for you, by specifying the -y c:\path\to\output.yar parameter to write the rules out into a human readable Yara file.
Running this, we end up with a .yar file containing multiple Yara rules which look like the following:
Now we can use this Yara rule with Yara to confirm it matches on the default Havoc artifact.
Now we've dumped the rules and can udnerstand what bytes they are looking for - we need to understand what these bytes actually represent and whether we can modify them. Again, since Havoc is opensource we can then just modify the code to patch out the signatures.
So first, if we load the Havoc artifact binary into Ghidra and do a search for the binary pattern we come across this curious function:
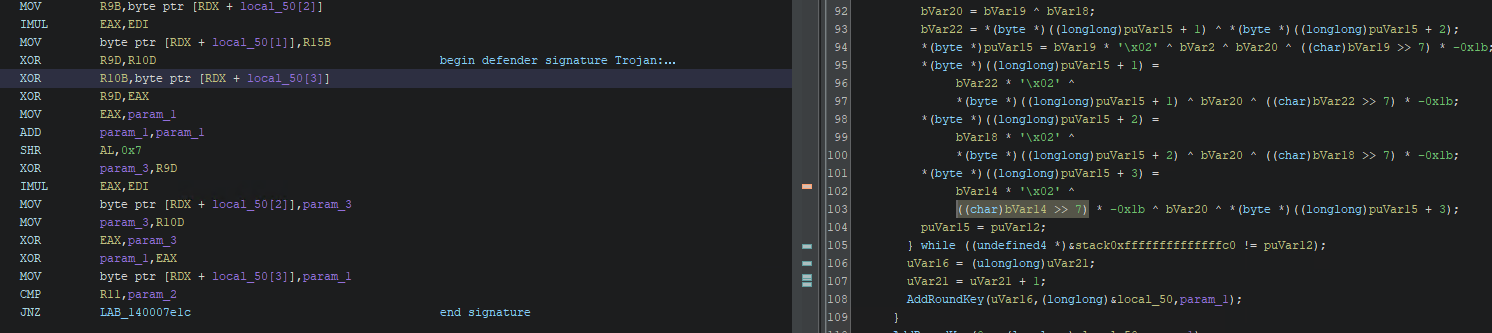
I've commented where the bytes of the first signature start and where they end to help identify where this is in the pseudocode. Unfortunately, even when compiled in debug mode, the code is still quite heavily optimised and inlined. After doing a fair bit of staring and searching, I identified this code as part of the AES crypto routines in payloads/Demon/src/crypt/AesCrypt.c.
Specifically, the >> 7 and * 0x1b were helpful in identifying this as an inlined version of the xtime function. Looking at the code there are a couple of ways we could break this signature. First we could tell the compiler not to inline the function. This can be done by adding __attribute__ ((noinline)) to the function signature. However, in this case I just re-purposed the same trick we used in the Elastic patches and just introduce some volatile variables to change the stack-size/instruction order.
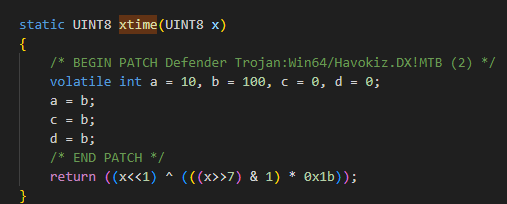
Another signature was also found in the ProcessCreate function. Again, I used the same volatile int trick.
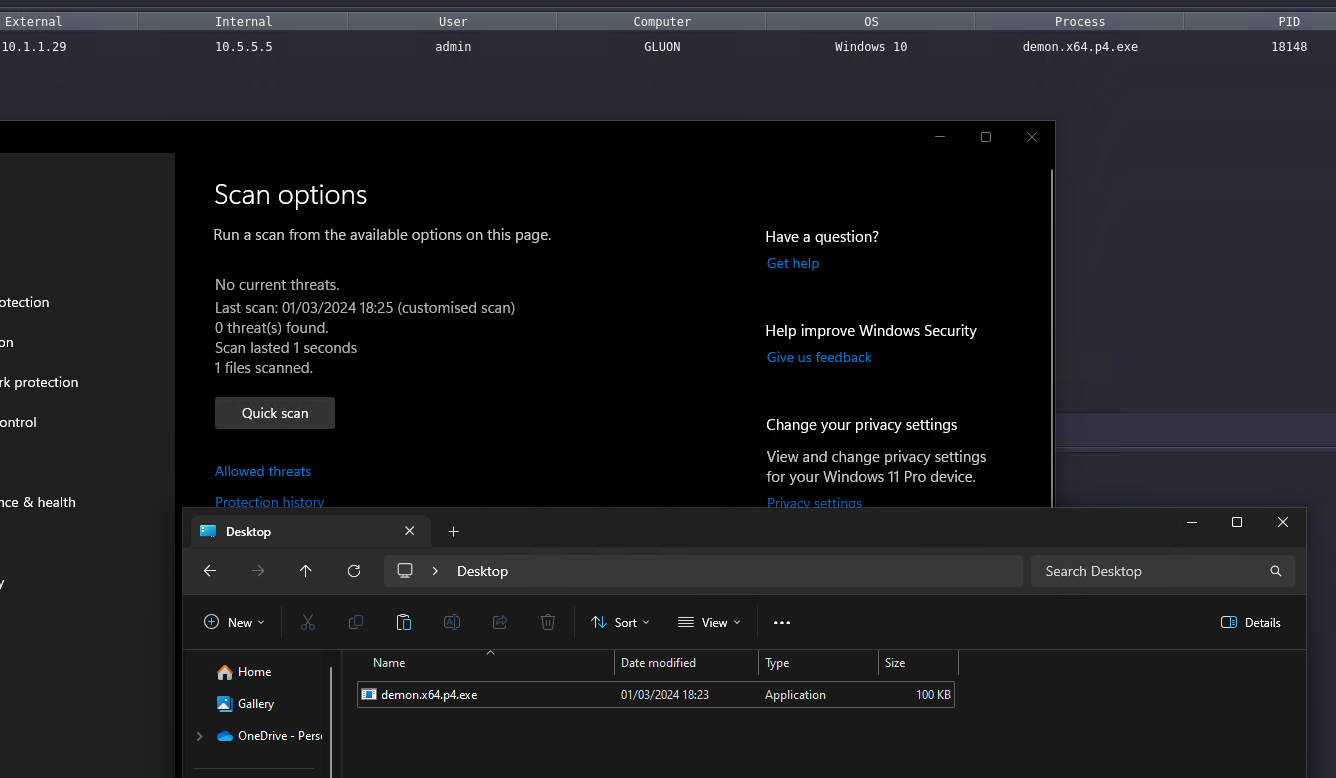
Once we've added our patches, we recompile the artifact in Havoc and scan it again with Defender.
And now it is not detected, even with a manual scan! 🎉
Note: these signatures are subject to change and Microsoft is always adding new signatures to Defender. To help with this, the re-offender tool has a Gitea action that will parse out any rules relating to Havoc and update the
sample_datafolder in the repo. Currently this runs on a daily basis, however we don't parse the delta updates, so will only find new rules monthly (the plan is to support the more frequent delta updates in the future). We also want to create some automation/alerting for continual scanning of artifacts with exported Defender/Elastic rules.
X-Havoc IOC
By default Havoc includes a hardcoded IOC in its Web Server which can be used to identify Havoc servers. In the default configuration Havoc will return an X-Havoc: true header.
We've patched this out in our fork. We also added a patch to drop this header in the Traefik reverse proxy for Rundeck deployments.
Useful third-party tooling
This section details any useful third-party tooling that can be used with Havoc (e.g. extensions / scripting).
References
- Havoc Documentation
- Havoc GitHub repo
- C5pider - Modern implant design: position independent malware development
- Elastic Security - Detecting In- Memory Threats with Kernel ETW Call Stacks
- Elastic Security - Peeling back the curtain with call stacks
- Detection of hidden shellcode via CFG bitmap anomalies
- Elastic Security - Get- InjectedThreadEx – Detecting Thread Creation Trampolines
- ZScaler ThreatLabz - Havoc Across Cyberspace